This guide is specifically designed for the super users of the Profit.co software. As the super user is open to special privileges to administer and maintain the system of the organization, this guide helps them to learn the functions and understand their key role better. This guide will foster the responsibility and the managing competency of the super user.
As the super user’s enjoy super access to system administration and the software management, it is vital that they know their role better, instead of diving into the account without having any prior orientation about the product. This super user guide is chiseled in such a way that all the salient and the key functions of the Profit.co software is highlighted in a coherent order. Just go through the super user guide and learn how to enjoy a hassle free access to accounts in your administration. Starting from managing OKRs modules, Task, Engagement and Performance the key settings part is handled by the admin and you can know it all under a single roof.
Profit.co mainly focuses on establishing a customer friendly product that can be accessed from anywhere anytime at ease. So being a super user is more like managing the freedom of the fellow employees, so learn it better and manage it efficiently as you’re going to run the success story of your organization through your management skills.
Alignments & Dependencies
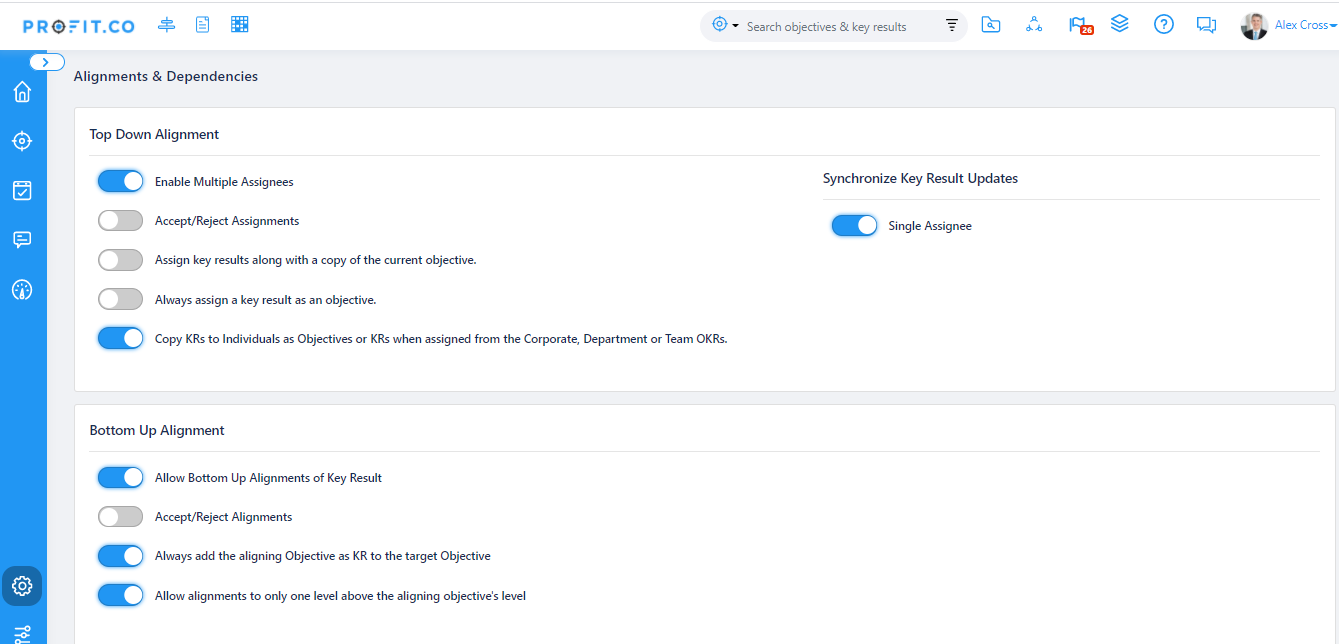
Alignment & Dependencies facilitates a hierarchical view of how your team’s objectives are aligned with your objectives and key results. Profit.co enables top down and bottom up alignments.
How to Access the Alignment & Dependencies page of OKRs?
- Go to Settings→ OKRs → Alignment & Dependencies from the left navigation panel.
- The Alignment & Dependencies Page will open. Here you can manage Alignments & Dependencies via this page.
To read more about Top down and Bottom up alignment, click here.
Top Down Alignment
In top-down alignment, you can align your OKRs in Profit.co by assigning your Key Result as an Objective, or, as a Key Result. This way, the assignee will receive that Objective or Key Result as a priority.
- Enable multiple assignees for one assignment.
- Assign a KR along with the copy of the Objective.
- Always assign a KR as Objective.
- Copy KRs to Individuals as Objectives or KRs when assigned from the Corporate, Department or Team OKRs.
Bottom Up Alignment
In bottom-up alignment of OKRs, while you create OKRs, you can choose which OKR you want to align with and can view the OKRs from the bottom-up alignment. A good alignment will ensure that your employees focus on Tasks and KeyResults that matter to the organization
- Allow Bottom Up Alignments for Key Results.
- Accept/Reject Alignments
- Always add the aligning Objective as KR to the target Objective
- Allow alignments to only one level above the aligning objective’s level
Baseline
How to create a new Baseline Sequence?
- Super users can create and save baseline sequences, so that the users can use them while creating Key Results.
- Click on Settings → OKRs → Baseline Sequence to open the Baseline sequence page.
- Click on the given link to learn, the steps to create Baseline sequence in Profit.co
Controls
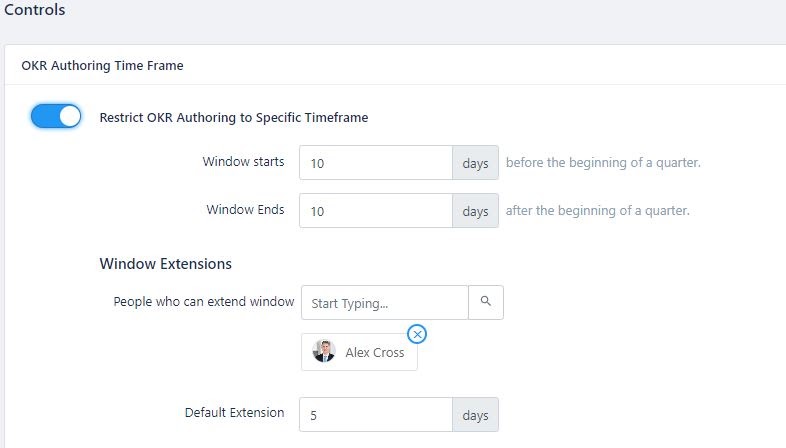
The superuser can control the time frame for setting up of OKRs. Some objectives may have been planned quarterly while some objectives would have been set annually by the organization. If the superuser wants to restrict the time frame for an OKR, he can enable the toggle to set up the time frame for objectives.
The default settings consist of the window starting time 10 days before the beginning of a quarter and ending time 10 days after the beginning of a quarter. The superuser can customize these settings as needed.
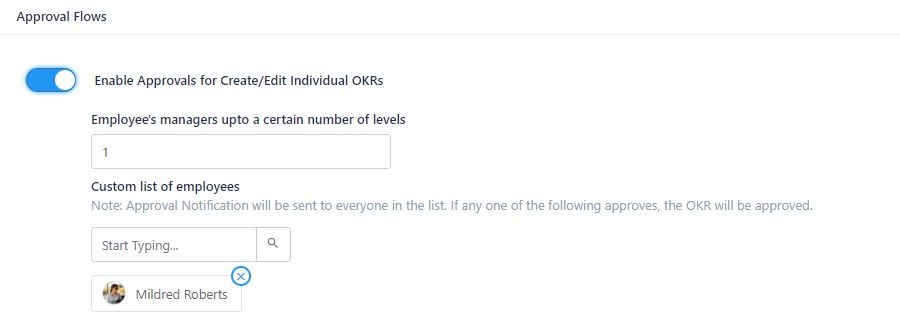
The superuser can also enable approval flows for users to create and edit their individual OKRs.
To set approval flows, the superuser needs to enable the toggle. The default number of employees managers entitled to approve the OKRs would be 1. But, this setting can be extended for any number of employees. Though the approval notification would be sent to everyone in the list, approval from anybody in the list is sufficient for creating or editing OKRs by the employee. The approval status would be visible under the ‘pending OKR approvals’ menu for the user.
To know more on how to restrict users from creating OKRs, click here. To learn more about approval flows, click here.
The superuser can also assign weightage to each key result under OKRs in order to rank them in the order of importance. The assigned weightage will affect the total average score of the OKR. To know more about how to define weights for key results, click here.
The superuser can also monitor and accept or reject the movement of OKRs from one department/team to another by enabling the toggle. To learn more about controlling the movement of OKRs, click here.
Frequencies
Profit.co comes with a vast number of check-in frequencies that you can select from.
You can set the default check-in frequency for the OKRs of your department according to their work plans. Click here to know more about frequencies.
Meetings
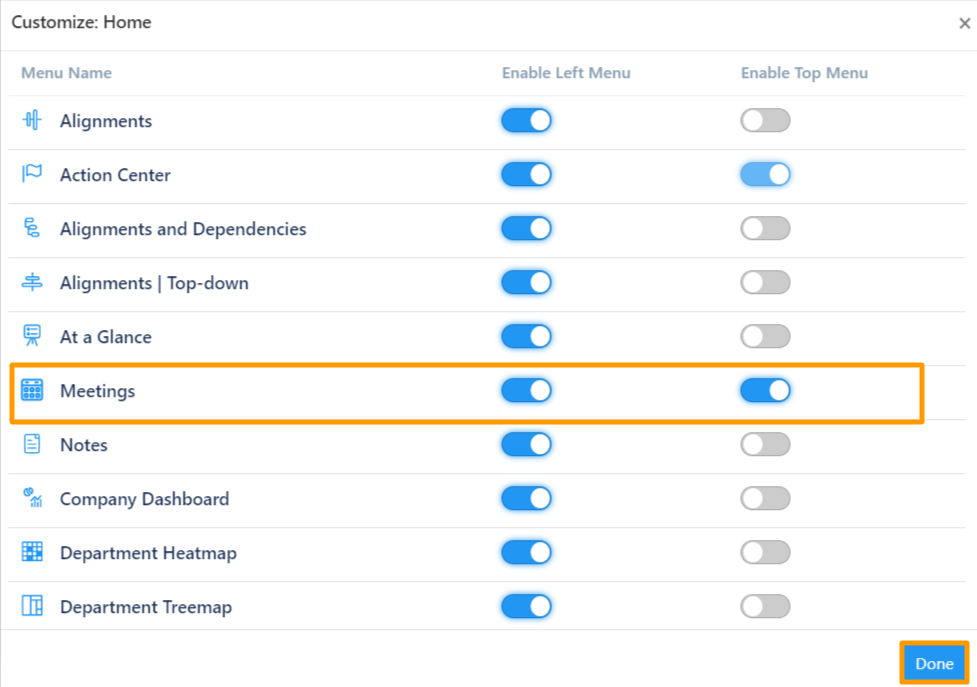
Profit.co allows you to create meetings as a unique feature and present a platform for the teams and departments of the organization to conduct regular meetings and connect with each other. We should enable Meetings first to create it.
After enabling we can schedule a meeting by adding a proper time and date.
Department Heatmap
A heatmap is a graphical representation of OKRs progressed department wise where values are depicted by color codes. Heatmaps make it easy to visualize complex data and understand it at a glance. We are going to provide an option to generate a heatmap dashboard for department OKRs.
To know more about the department heatmap, click here.
Key Result Types
You can choose your key result type in Profit.co. Click here to know more about it.
How to Enable/Disable Key Result types?
Navigate to Settings → OKRs→ Key Result Types from the left navigation panel.
You will be directed to the Key Result Types page. Here you can Enable/Disable Key Result based on your requirement.
KPIs
KPIs can be associated with key results to track quantitative outcomes and to measure the achievement of your Objective. You can also define and maintain a library for KPIs where you can create KPIs based on your business needs. After creating KPI you can allow your employees to select, use and reuse KPIs for better tracking and reporting. You can also create KPI category in Profit.co.
Also, check out Aggregate KPI, Extension KPI.
Milestone Sequence
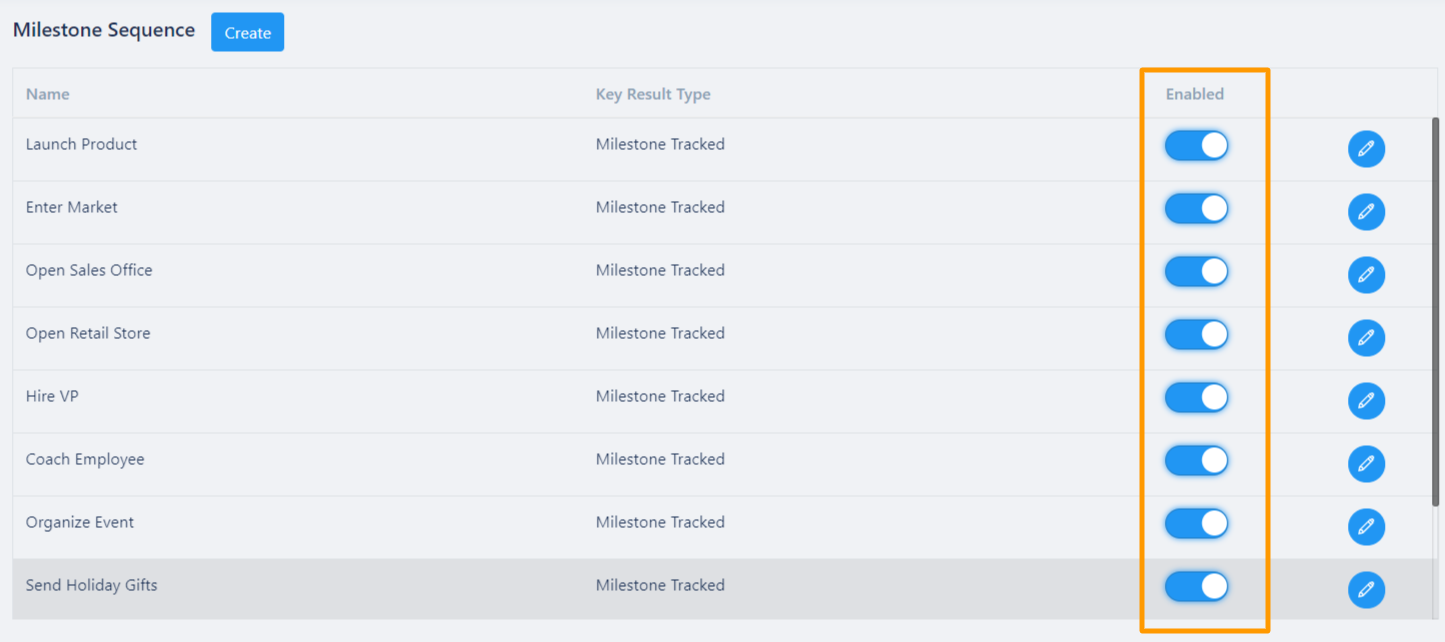
Superusers can create and save milestone sequences, so that the profit users can use them while creating Key Result.
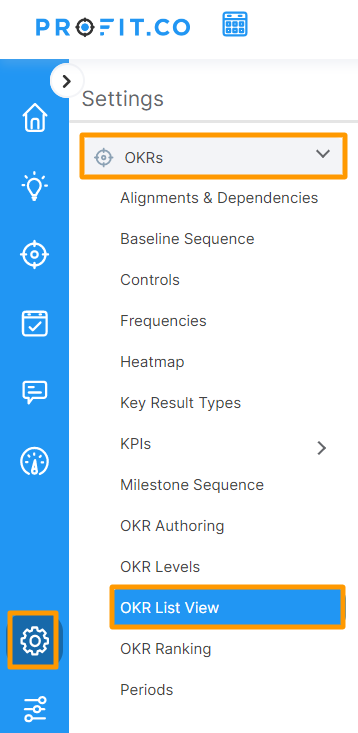
Click on Settings → OKRs → Milestone Sequence to open the Milestone sequence page.
- This Toggle against the Milestone sequences is used to enable or disable the Milestone sequence , that can be used while creating a Milestone to track key results.
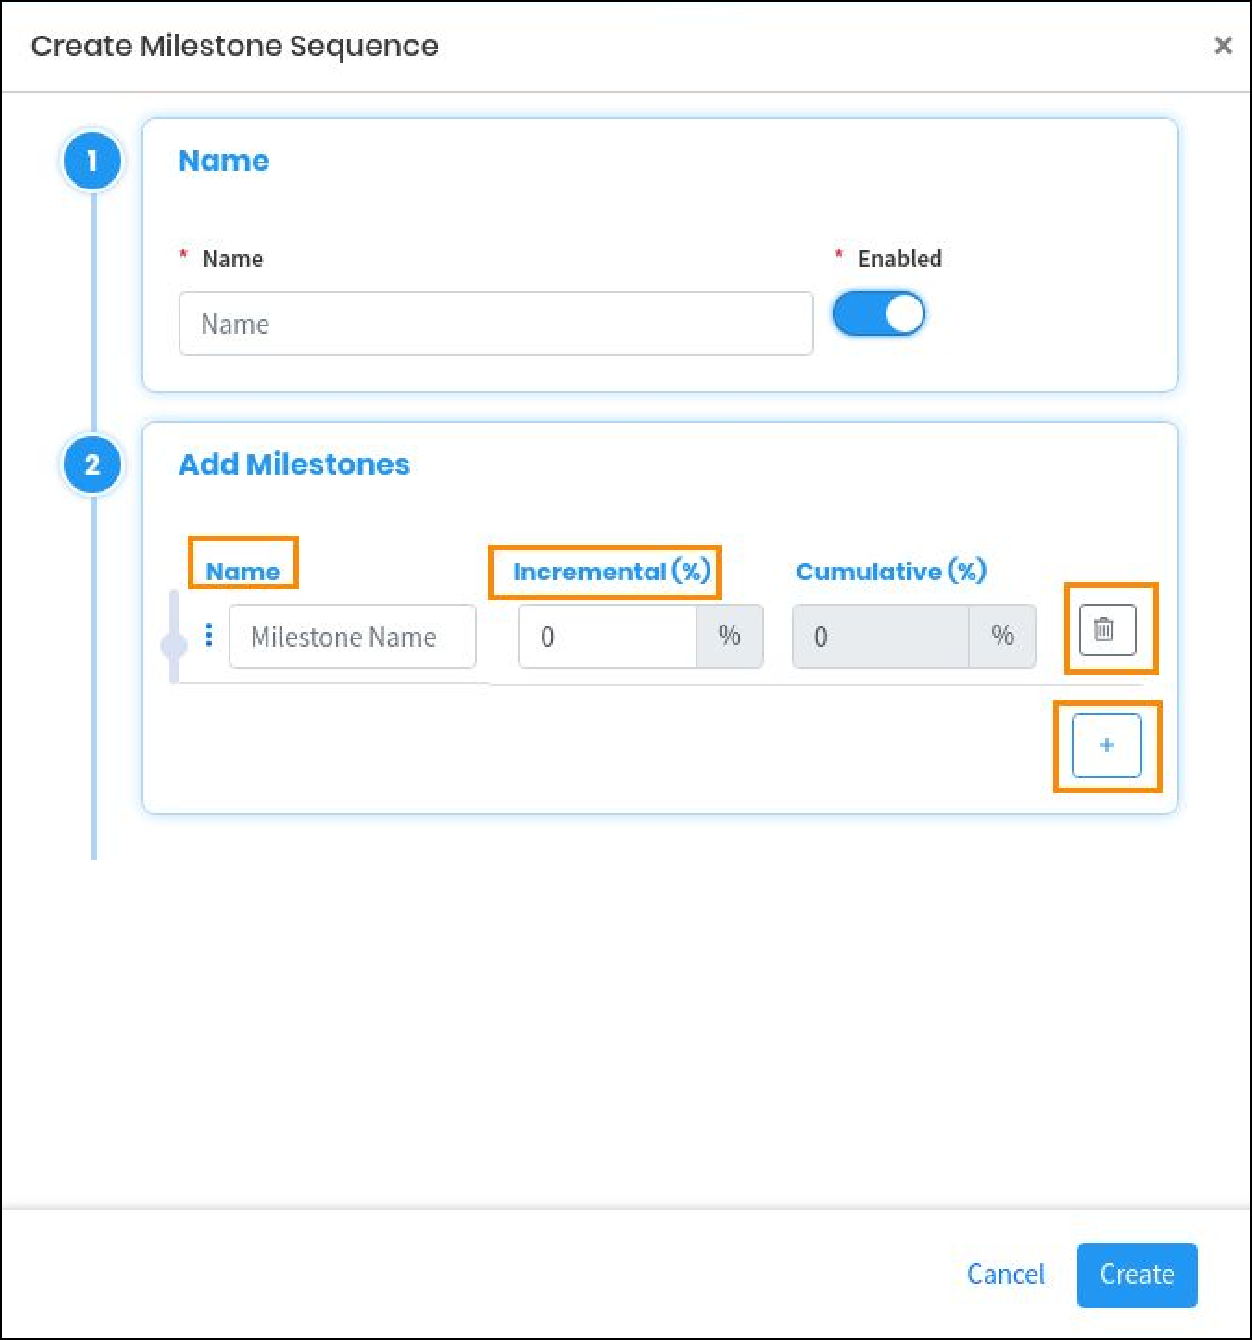
- Click on the Create button, a side panel will open.
- Enter the name of the Milestone sequence.
- This toggle prevents/allows the Milestone sequence to be displayed when creating a Milestone that tracks key results.
- Enter the Sequence name and incremental percentage of the Milestone as per your convenience.
- You can also delete a sequence by clicking on the Trash icon and + icon to add a milestone sequence.
Note: Cumulative percentage should not exceed 100% while providing incremental percentages.
- Once you complete, click Create to create a new Milestone sequence.
OKR Levels
We can set OKRs at four levels. Every company will have multiple departments and sometimes companies have cross-functional departments that work towards solving a particular problem.
How to enable all Four Levels of OKRs
- Navigate to Settings→ OKRs → OKR Levels from the left navigation menu.
- Enable the Toggle keys. (By default Individual OKRs will be enabled)
- Super users can enable all levels like corporate, Departmental, Team and Individual OKRs.
- The Authorized user or the head can create OKRs under the respective levels.
OKR List View
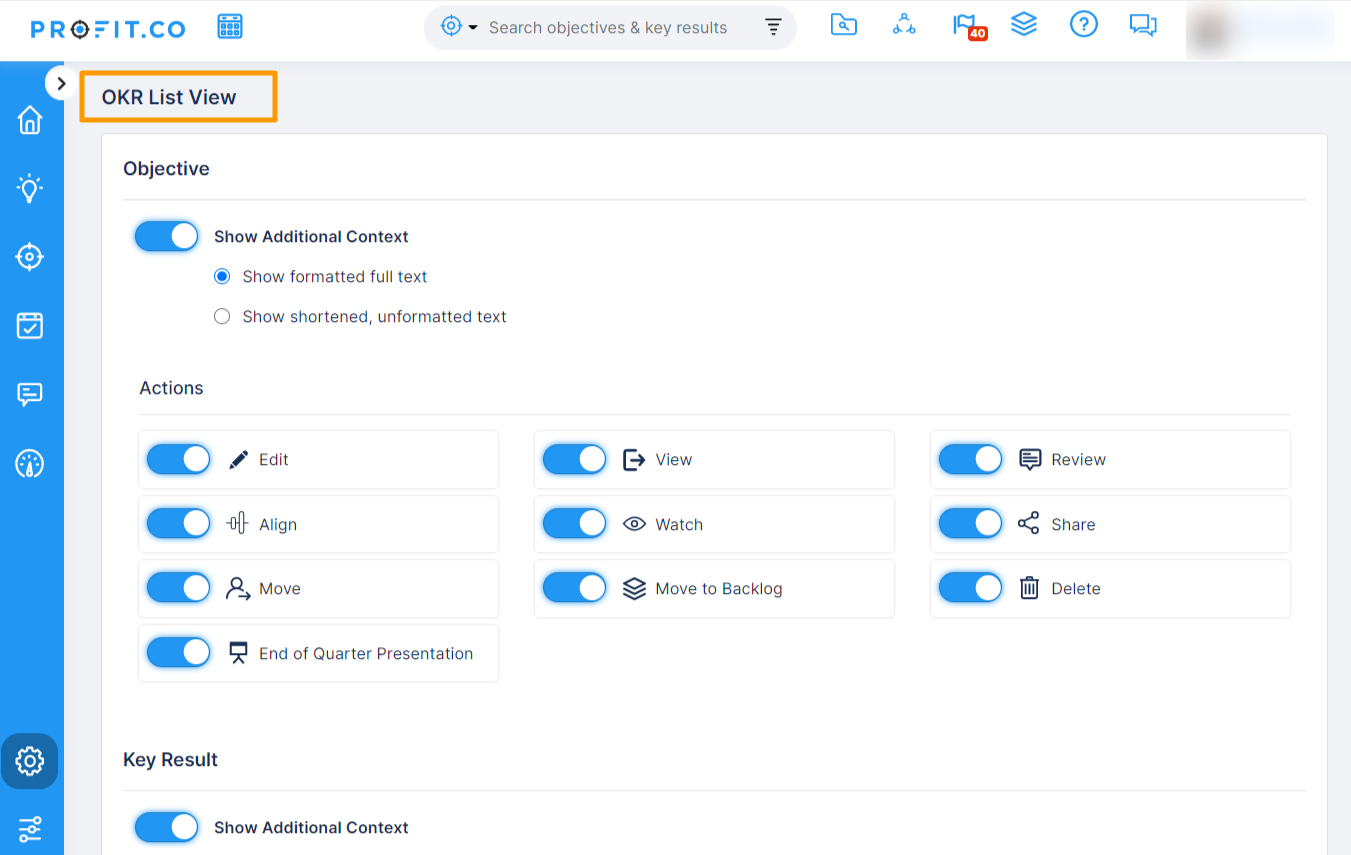
The OKRs list view setting in Profit.co, helps you to customize the view of the OKR list page. Click here to know more.
End of Quarter Presentation
The End of Quarter presentation is a tool in Profit.co that helps users quickly and easily create a PowerPoint presentation with Overall OKR progress and KR progress for the current quarter, and plan for the next quarter for any department and available in all department tabs.
First we have to enable the toggle for End of Quarter Presentation.
To know more about this click here.
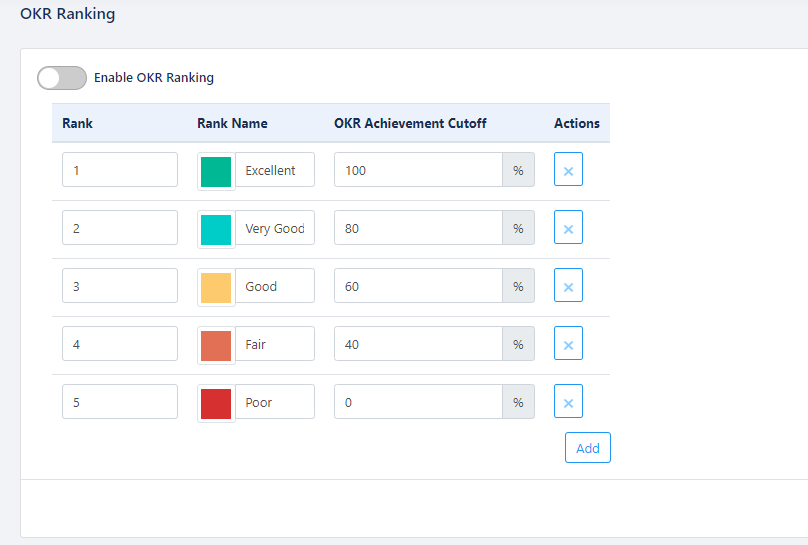
OKR Ranking
Profit.co allows you to rank the OKRs based on the progress. You can now rank the OKR achievement of the employees and reward them achievement scores with OKR Ranking.
Note: OKR Ranking applies to the Corporate, Department, and Team OKRs. The predefined ranking can be customized and new ranks can be added by the superuser.
Check out the complete steps to enable OKR Ranking.
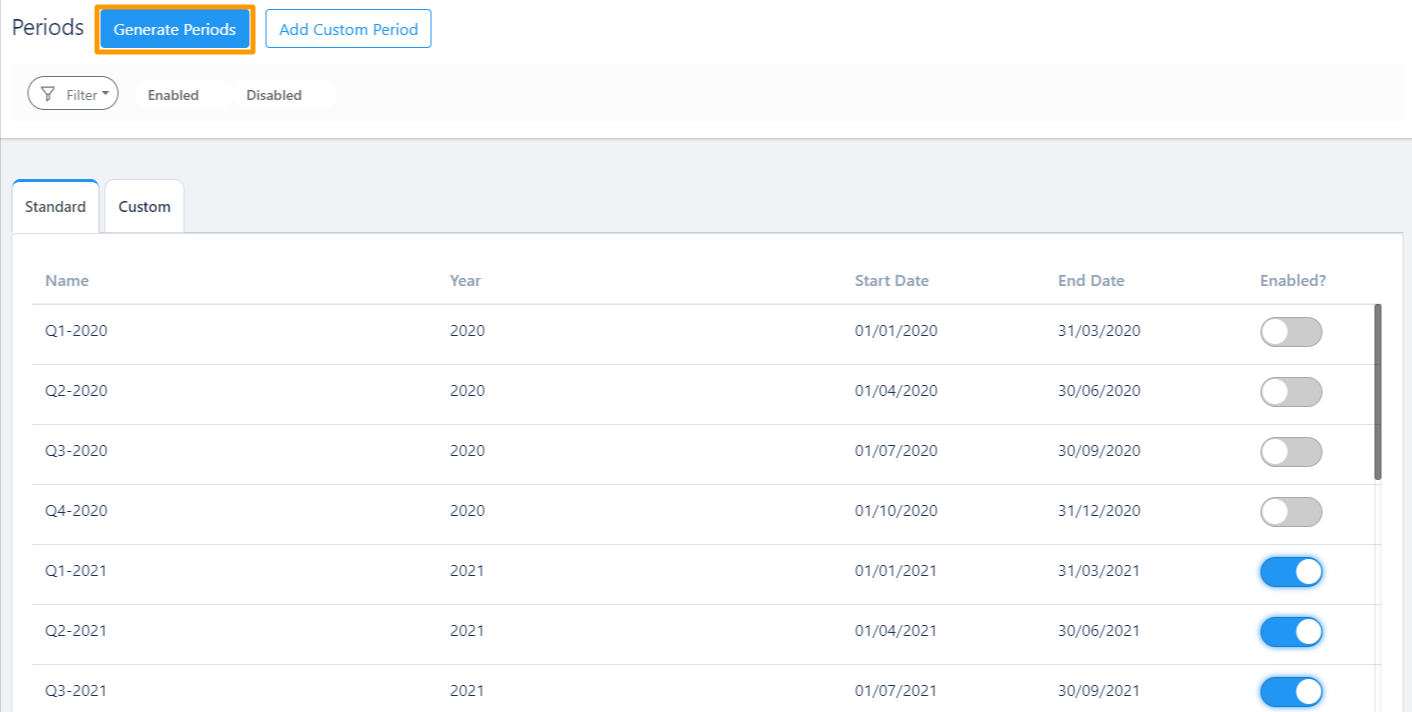
Periods:
What are Periods?
Using Periods you can generate time periods for your OKRs. Periods help you to manage the quarters by letting you decide the Start date and end date of Quarters, thereby helping you to keep track of your OKR progress every quarter that has been set. Click here to learn more about generating periods.
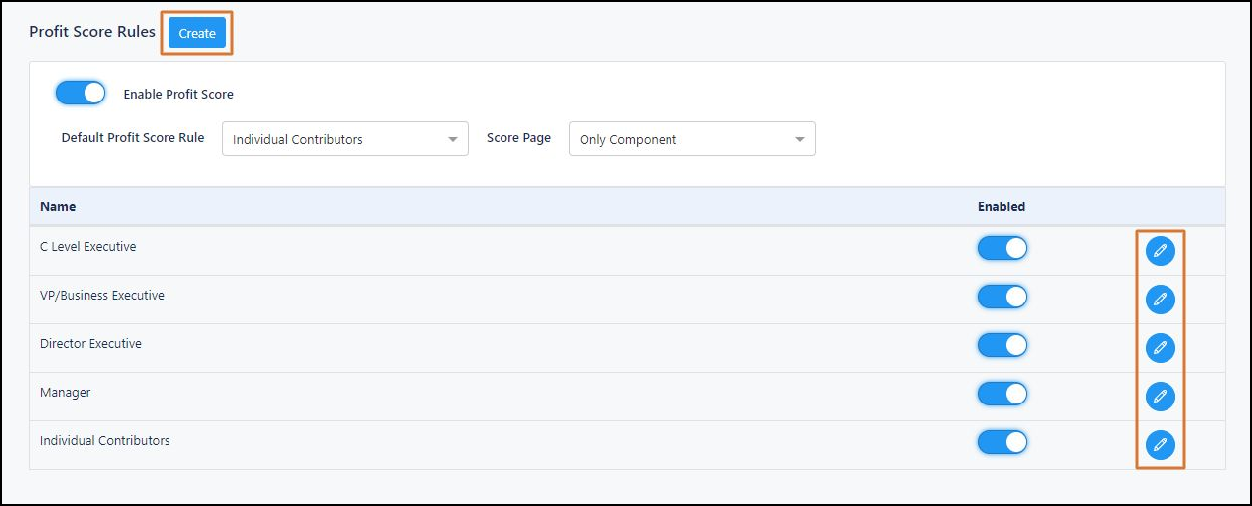
Profit Score Rules
Profit.co Score rules help you to manage the Profit.co score of the users based on their hierarchical roles.
How to create/edit Profit Score?
Go to Settings → OKRs → Profit Score Rules in the left navigation panel.
To create Profit Score Rules, Click on the Create button in the Profit Score Rules page.
- In the Create page, assign a name for the Profit Score rules, now enable the toggle and give a description of the Profit score rules that you want to create.
- Once you fill in the above mentioned details, you can move to the second stage. Here fill in the details % of profit score, penalty per miss, Grace period and Free misses.
- Now you will be moved to the 3rd stage, now fill in the % of profit score, under personal achievement.
- In the 4th stage, fill in the % of profit score under Department achievement.
- In the final stage fill in the % of profit score under Alignment and % of Target Alignment
%. Once you fill in the details click on Update.
Reflect and Reset
Profit.co allows you to Reflect/Reset the data that you enter in the OKR. The Superuser can enable Reflect/Reset in the setting menu from the Navigation panel on the left side. Know how to enable Reflect and Reset.
OKRs Reviews
OKR Reviews helps you to customize the Master Layout of the My organization and My department OKRs Review. Learn how to enable and conduct OKR Reviews in Profit.co.
Tags
Tag is a feature that helps the user to associate the objective to a particular section. Click here to know the way to create tags.
Templates
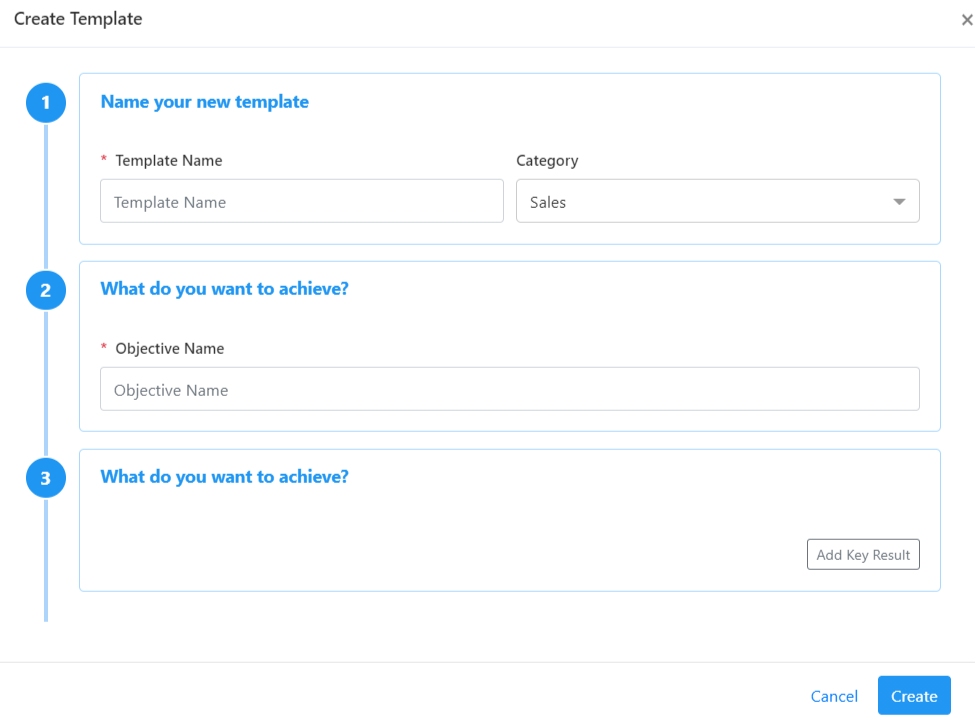
OKR templates allow users to quickly select an OKR that closely matches their objectives. They can use the key results in the objective as it is or edit it to suit their goals. Check out how to create templates in Profit.co.
Visibility
The superuser can select the visibility of the individual OKRs, team OKRs as well as department OKRs. The visibility can be customized in various ways like visibility to all employees,visibility only to the management, only to direct supervisors or only to the superuser. The toggle can be enabled or diabled any time to alter these settings.
To know how to set OKR visibility, click here.
The department visibility and access list settings can also be changed. To know how to change these settings, click here.
Access list refers to a list of users that the superuser can grant access to the OKRs. They need not necessarily belong in the team. To know how to set team visibility and access list, click here.
The superuser can also create OKRs with restricted visibility or change the visibility after check-in has been completed.
Add additional information while creating OKRs:
You can add additional information while creating Objectives and Key Results.
To know more about this information click here.
Strategy
Profit.co offers the option to use OKRs as per the company strategy. Currently, this feature has been implemented for customers who want to link their OKRs with specific strategies. Using this feature, customers can align their OKRs as per the company strategy using the achievement of initiatives.
To access the strategy menu under settings, the superuser has to configure and enable this feature.
The four main attributes of an initiative include directives, priorities, measurements and focus area. Before creating a focus area, it is important to set directives and priorities for the focus area of the initiative.
Directives
First, enable the toggle to create directives. Select the user to whom you want to provide access for creating and editing directives.
Focus Area
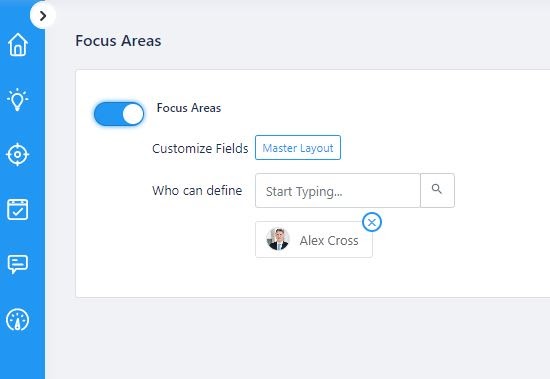
First, enable the toggle to create a focus area for the initiative. Select the user(s) to whom you want to provide access for creating and editing focus areas.
Initiatives
After creating an initiative, the user will have access to create and complete milestones under it. Only after the completion of all milestones under an initiative, the initiative will get completed. Approval for employees to create and manage milestones for an initiative can also be enabled so that the assigned employees’ first level managers can edit and manage the initiative.
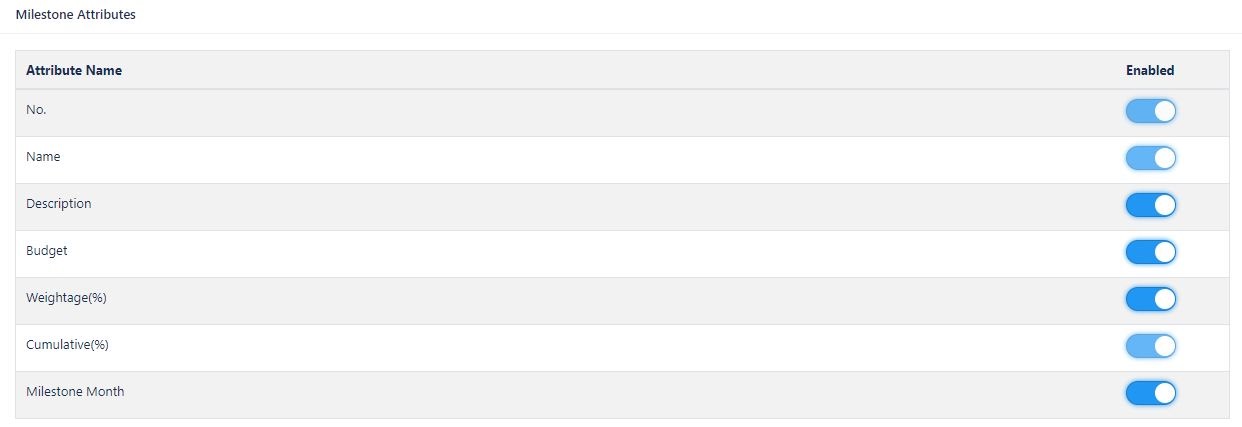
The milestone would also include characteristics like name, description, budget, weightage and milestone month. You can choose the necessary attributes to be enabled for each milestone.The progress of a milestone will determine the progress of the initiative which would in turn determine the progress of the aligned OKRs of the company.
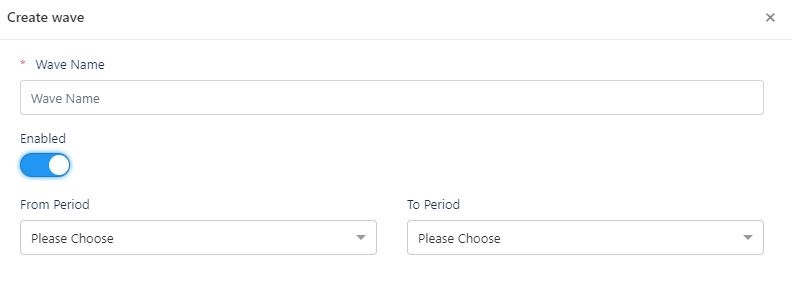
‘Wave’ refers to the duration of an initiative. The superuser should mandatorily create waves for an initiative before assigning users for the creation of an initiative. The wave can either be short term or long term.
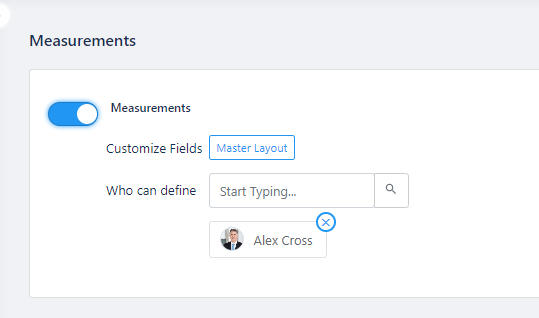
Measurements
First, enable the toggle to create measurements. Select the user to whom you want to provide access for creating and editing measurements.
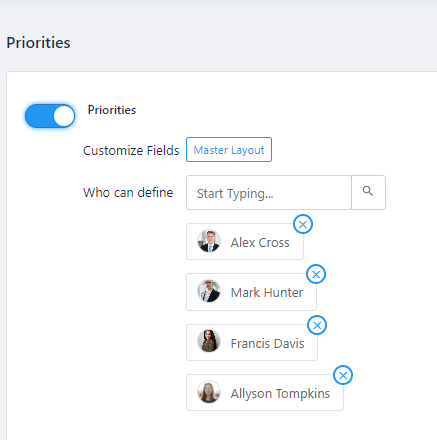
Priorities
You can define priorities for a strategy. First, select the toggle to enable priorities and select the user whom you want to assign to create and edit priorities.
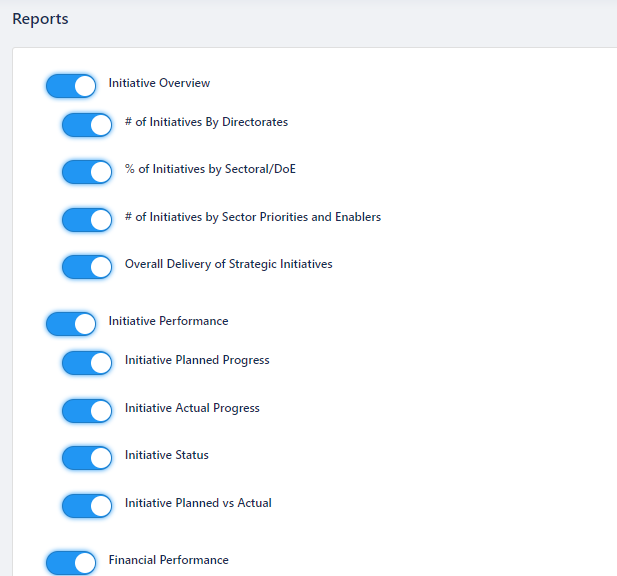
Reports
You can choose the required reports to be generated for the strategy by enabling the toggle for the Initiative Overview, Initiative Performance and Financial Performance reports you want to include in the strategy module based on your choice.
Tasks
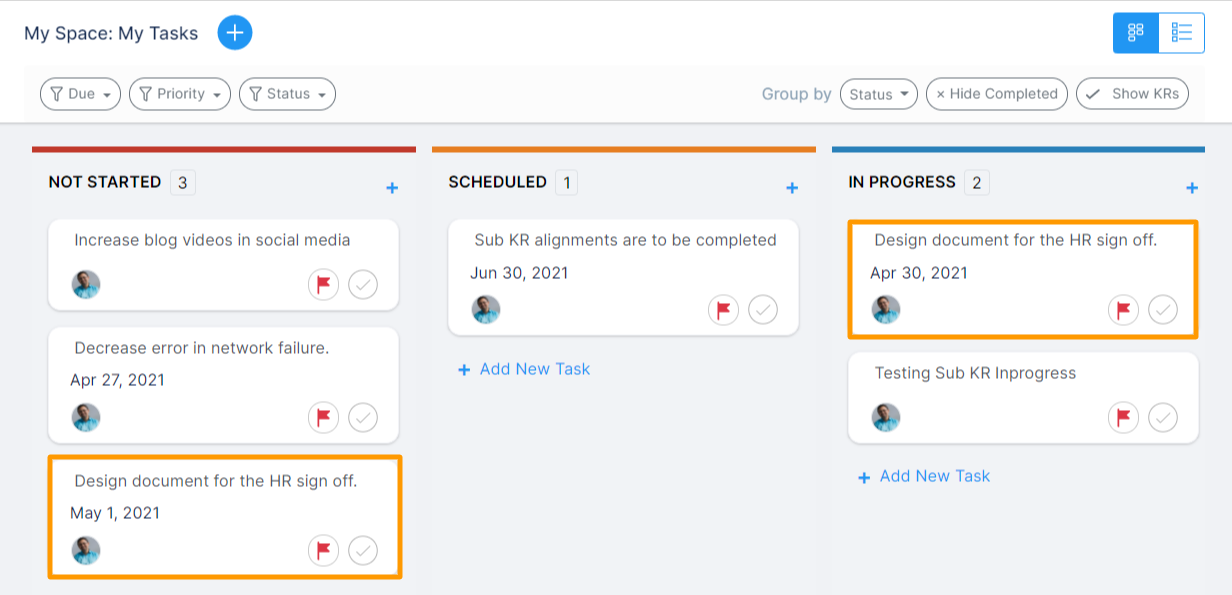
Profit.co offers a powerful task management system where you can Create, prioritize, and monitor tasks. You can associate tasks with Key Results, visualize workflow with Kanbans, assign tasks to others and also can view the department’s tasks.
Learn to add a new priority status to tasks by clicking here.
Security
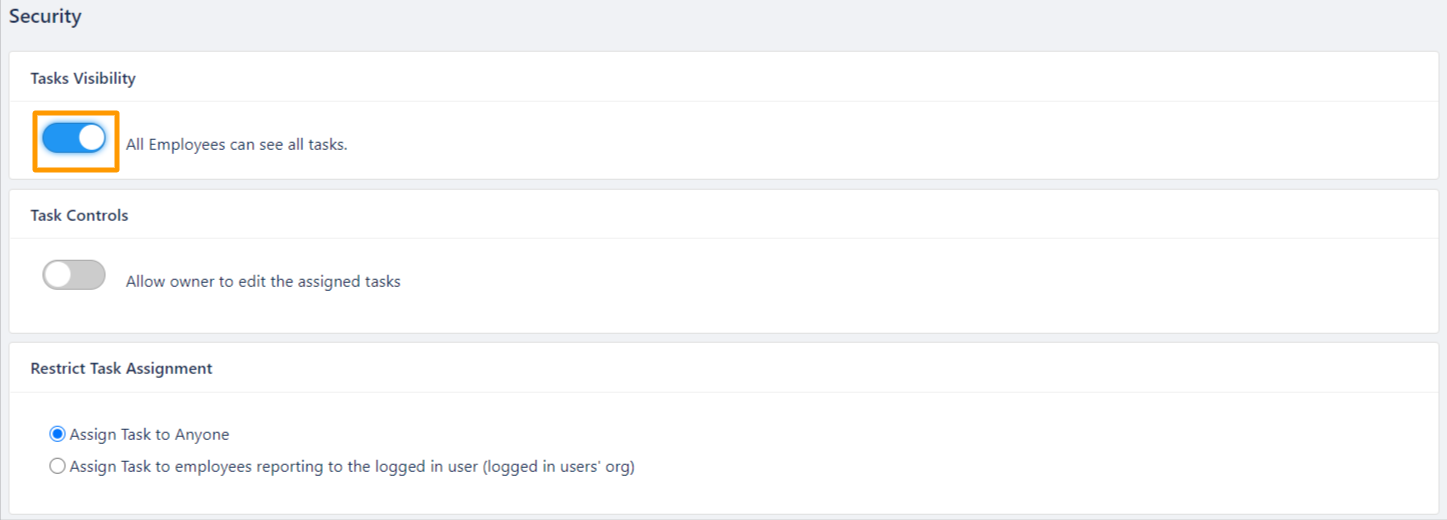
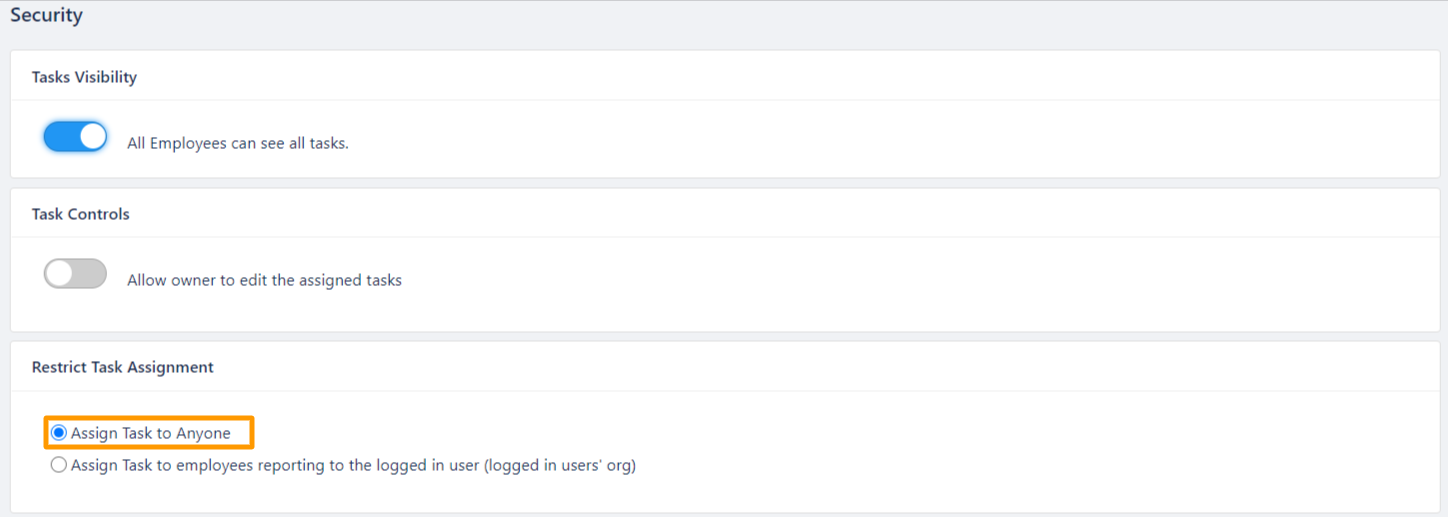
Under security of tasks, the superuser can enable the toggle for visibility of tasks, manage task controls by deciding whether or not to allow the assigned user to edit the given tasks and manage the assignment of tasks to employees. The tasks can be assigned either to any employee or can be restricted only to the logged in users.
Visibility of Tasks
Profit gives you the flexibility to set the visibility of tasks. You need to be a superuser to do this activity. Enabling the visibility of tasks allows all employees to view the tasks of other employees. You can also restrict visibility if you wish to.
Check out how to set visibility of tasks in Profit.co.
Check out how to create a new task in Profit.co.
Check out how to assign tasks to others.
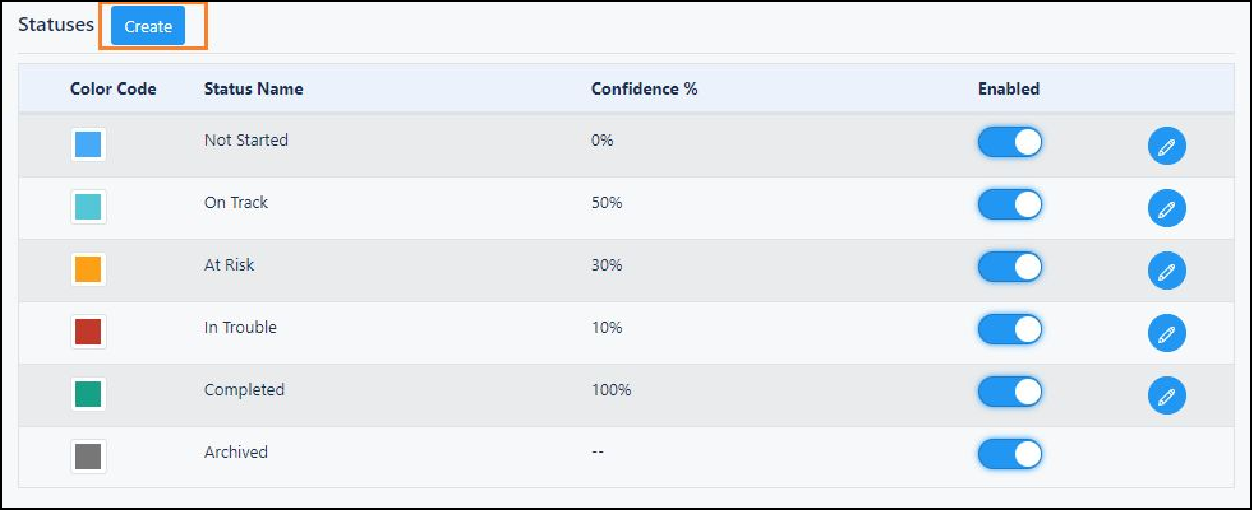
Add a new status to my tasks:
The profit comes seeded with standard task statuses that can be readily used in any organization. You can tag your Tasks to existing statutes and create, edit and update new status as per your needs. Also see, how to add new priority status for the tasks.
Learn more about adding new status to tasks in Profit.co.
See all employees’ tasks in one place
- Navigate to Settings → Tasks → Security from the left navigation panel.
- Click on the toggle to enable it. Now you can access all employees’ tasks under the tasks menu and you can edit the assigned Tasks.
- You can access all employees’ tasks under Tasks → All employees’ tasks.
Restrict task assignment
- Navigate to Settings → Tasks → Security from the left navigation panel.
- By default, you can assign tasks to anyone. Selecting the second radio button will restrict users to assign tasks only to their Org members.
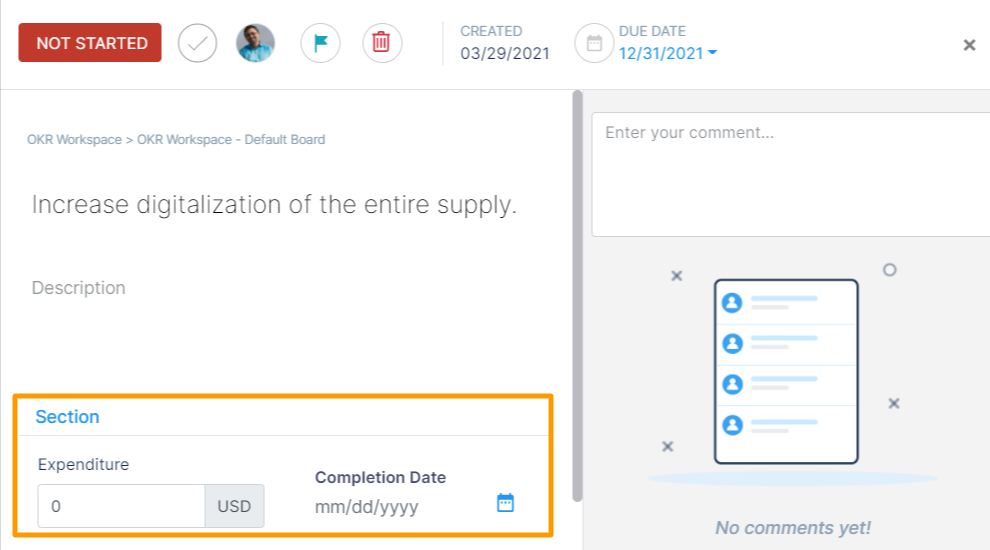
Set Custom Attributes for the Tasks
- Navigate to Settings → Tasks → Master Layout.
- By default, one section will be present. By selecting that you can edit the name in the Inspector tab. In the Palette section, you can add the attributes by moving it to the section.
- While creating tasks user’s can fill in the additional information.
Creating Recurring Task:
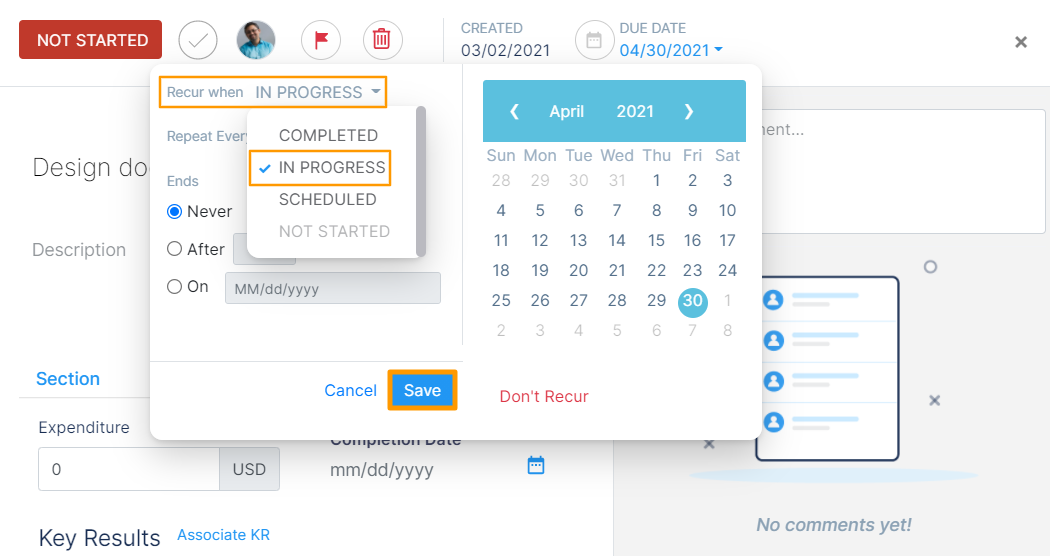
- Set recurring tasks with a scheduled time frame and an option named Recur When to perform your tasks without any interventions or confusion.
- To plan your daily and recurring tasks manually, you can now schedule the recurring tasks in advance.
- To set a recurring time frame click on that link Set recurring & set the status in Recur When and Save it.
- Therefore a new task will be generated only when the previous task’s status is changed to status which you have setted in the recurring process.
Notes
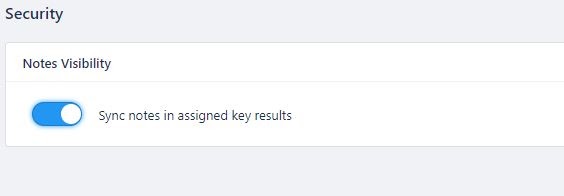
Under the settings menu, you can alter the visibility of notes under the KRs to which the notes have been assigned. If the toggle is selected, the notes would be synchronized and visible under the respective KRs and vice-versa.
ENGAGEMENT
Awards
The Organizational Reward System works on selecting the type of rewards depending on the credibility of the workers. The Engagement in Profit.co is customizable based on the Organizational needs. You can also find the awards and the points that can be allotted to the individuals.
Learn how to create and edit awards in Profit.co.
Initiate Pulse Survey
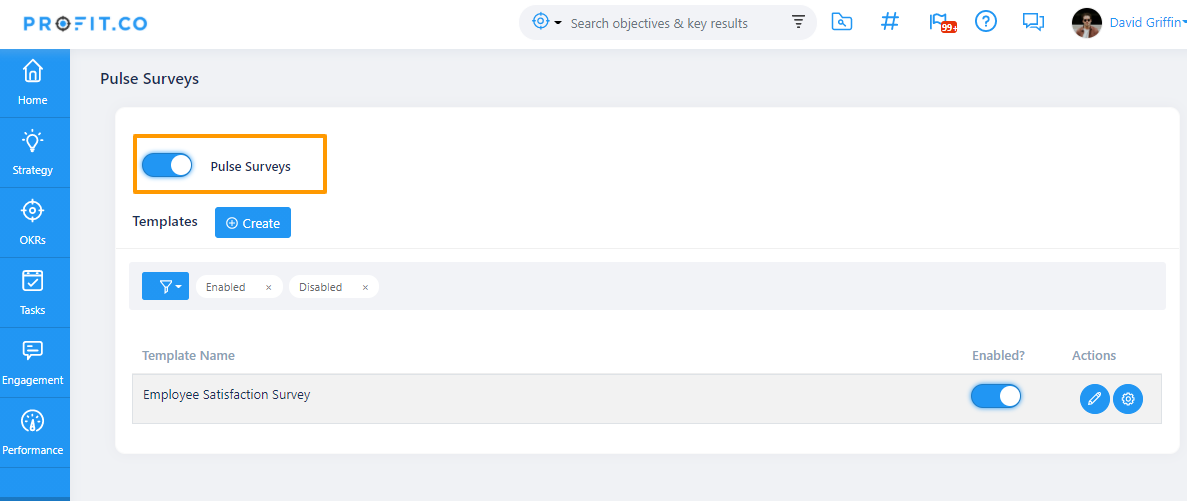
Pulse Survey helps you to conduct employee satisfaction surveys by giving them an opportunity to give their feedback on their satisfaction level as an employee on the product, strategy, or amenities that they are provided with by the organization.
Check out how to initiate a pulse survey in your organization
Also, check out how to complete a pulse survey in Profit.co.
User Management
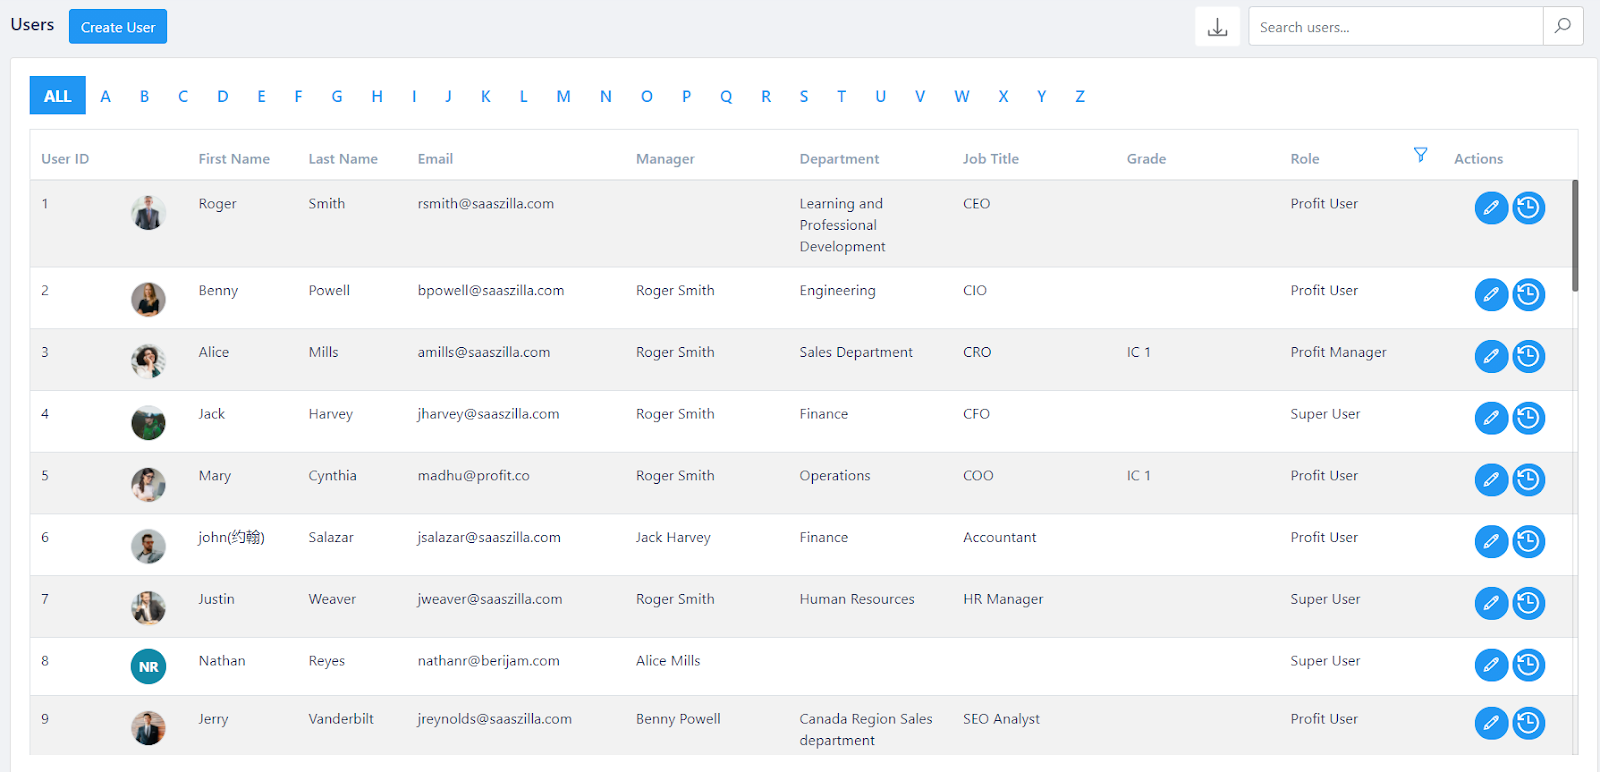
You can always add new employees to your Profit.co account, as long as your account is subscribed and active.
Learn how to add a new employee in Profit.co.
Click on the link, to know How to set up a new department.
Number Generation
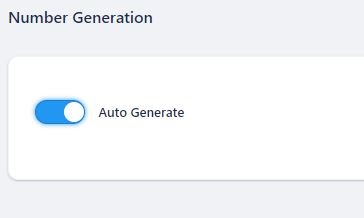
The superuser can decide the unique identification numbers assigned to new/existing employees to be generated at random by enabling the ‘auto generate’ toggle under number generation in the user management tab under the settings menu. If the superuser wants to assign a specific number of his/her choice to the employees, they can disable this toggle in order to do so.
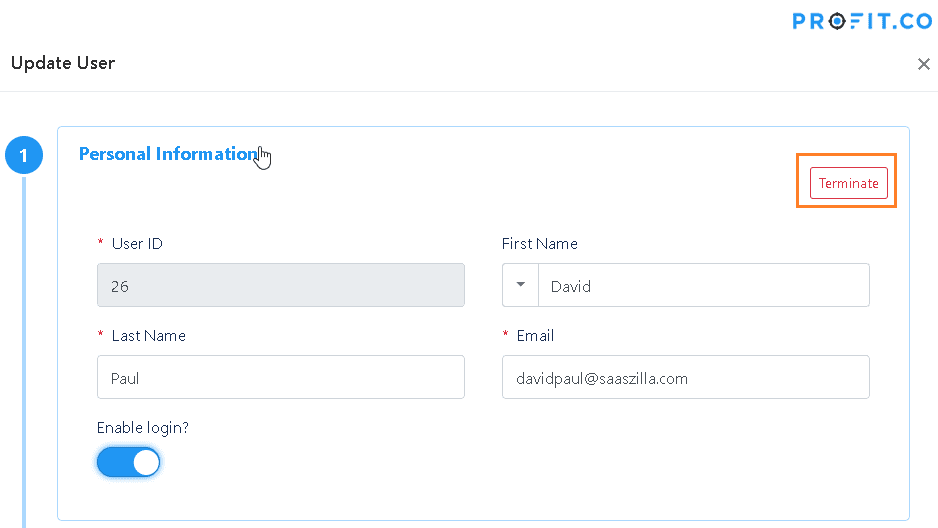
Terminate/revoke users from Profit.co
When an employee leaves an organization, you may consider removing the employee’s profile from Profit. Click here to learn how to terminate/ revoke users from Profit.co.
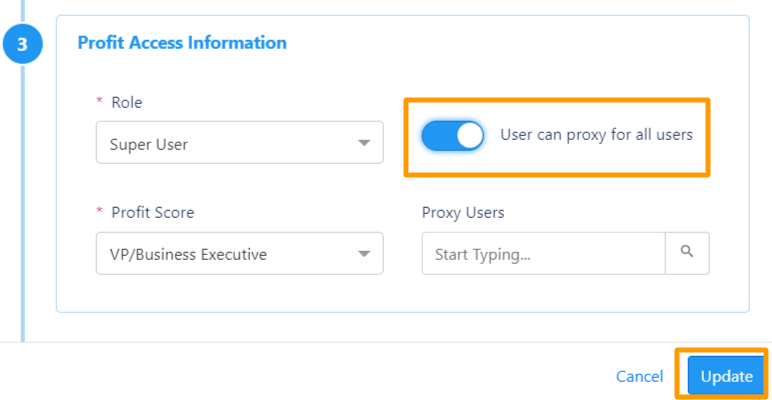
Proxy all the users
Super users can proxy all the users in the firm by a simple option provided in the User Management of Profit.co. Click here to know how to make yourself a proxy user in Profit.co.
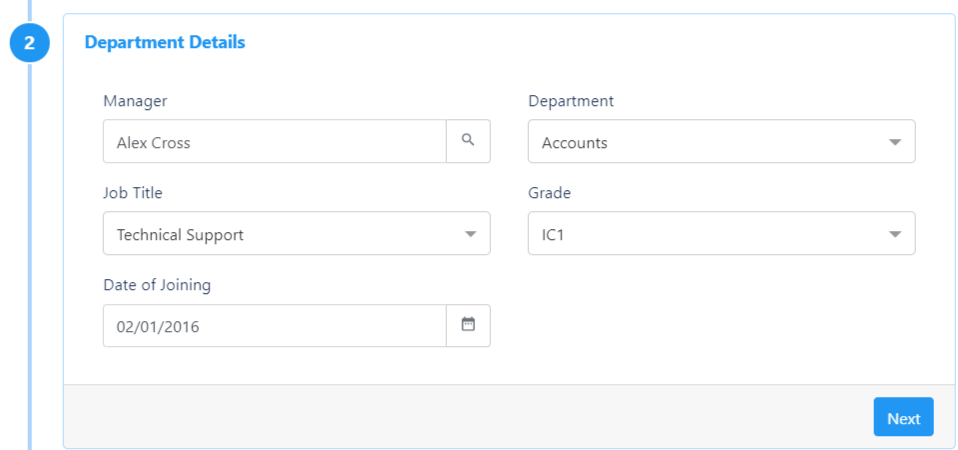
Set up a new department and department head
Profit comes seeded with departments that are commonly used in most organizations. You can edit the existing departments as per your need or create new departments. You need to have employees created ahead of time before you can assign them as department heads to departments. Click here to set a new department and new department head.
Create a new job title
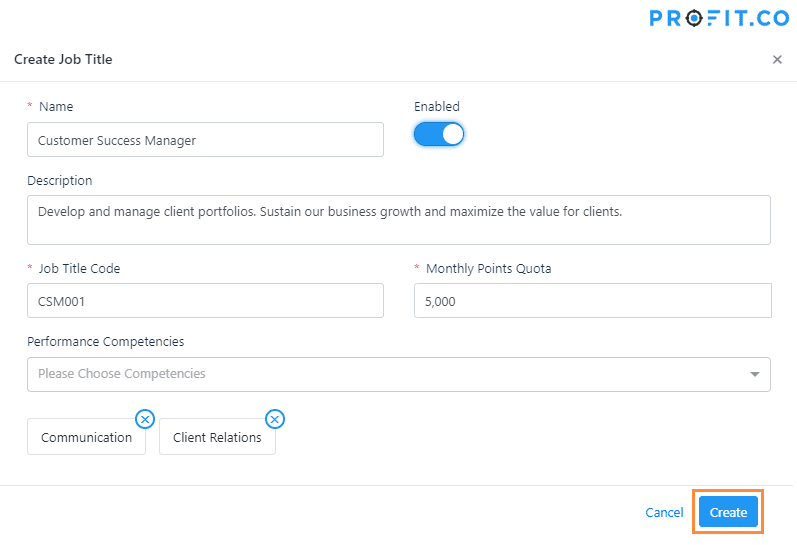
In Profit, you can assign Job titles to every user. Our OKR solution comes seeded with a vast number of commonly used job titles in companies. You can edit or create new job titles for your users. Read more to know how to add a new job title.
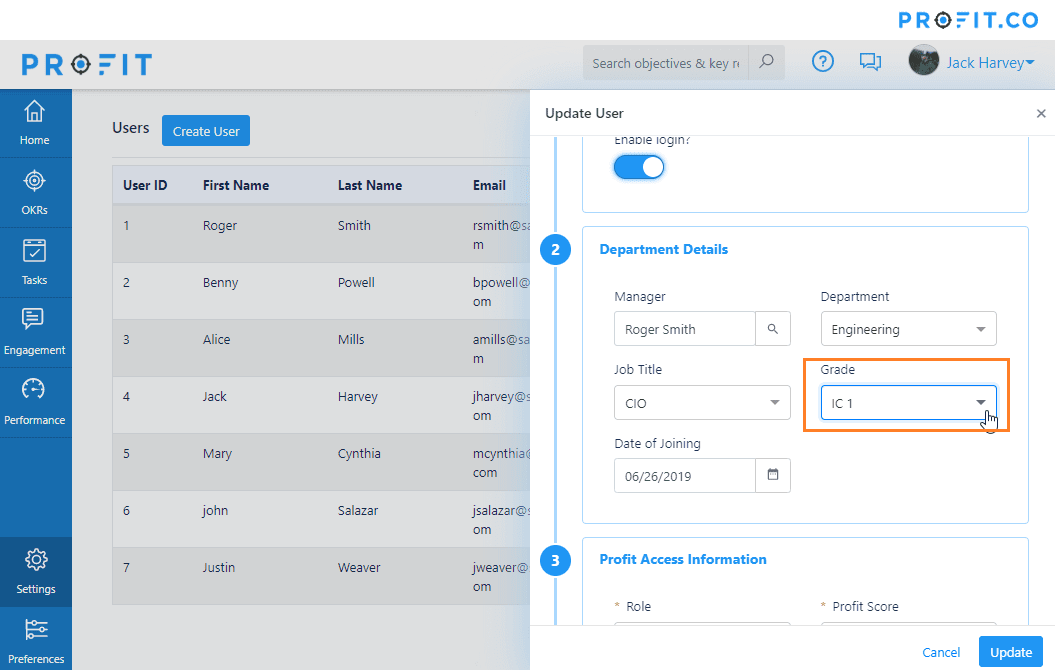
Adding job grade to an employee
Assigning relevant grades to employees allows your organization to conduct accurate performance reviews. Learn how to add a job grade to an employee in Profit.co.
Performance Management
Add Competencies:
API Access :
Competencies are measurable skills or abilities that an individual needs to perform their job roles successfully in an organization. These competencies are measured through rated scores. Learn how to add competencies in Profit.co.
Enable performance review:
Performance review helps to assess and evaluate the performance of the employees. Click here to enable performance review in Profit.co.
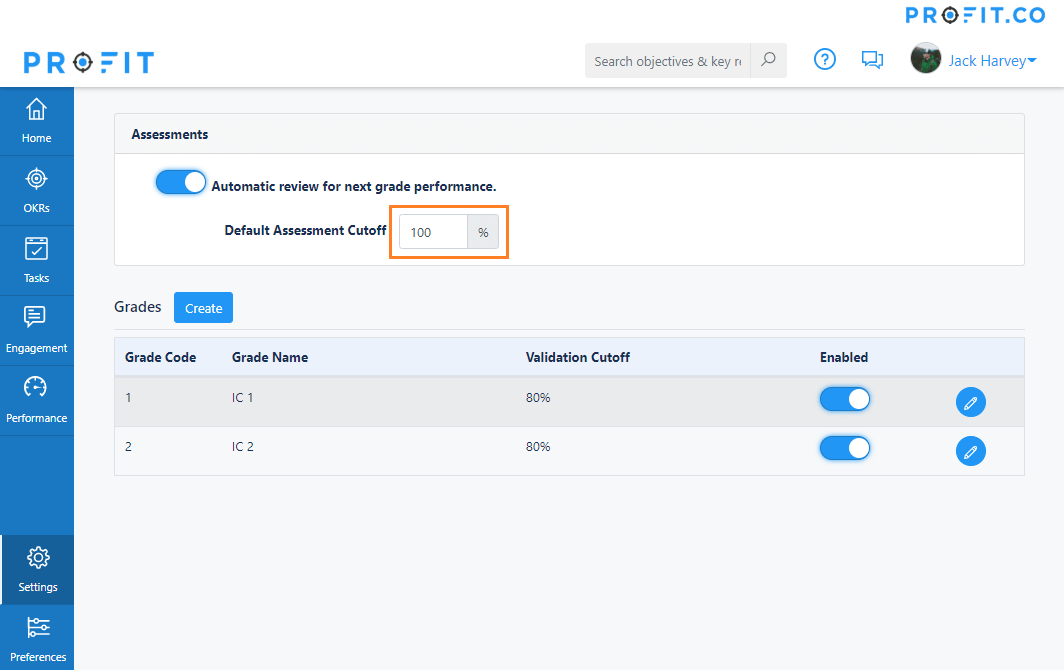
Initiate automatic review for next grade performance:
There are scenarios, where the HR administrator wants to perform the next grade review for an employee when their manager review score is above a threshold. Click here to initiate automatic review for next grade performance in Profit.co.
Create employee/job grades:
Employee grading is one of the practices used in performance management. Many organizations use employee grades to differentiate between positions and determine the level of complexity, decision making, and skills required for each job. Learn how to create employee/job grades in Profit.co.
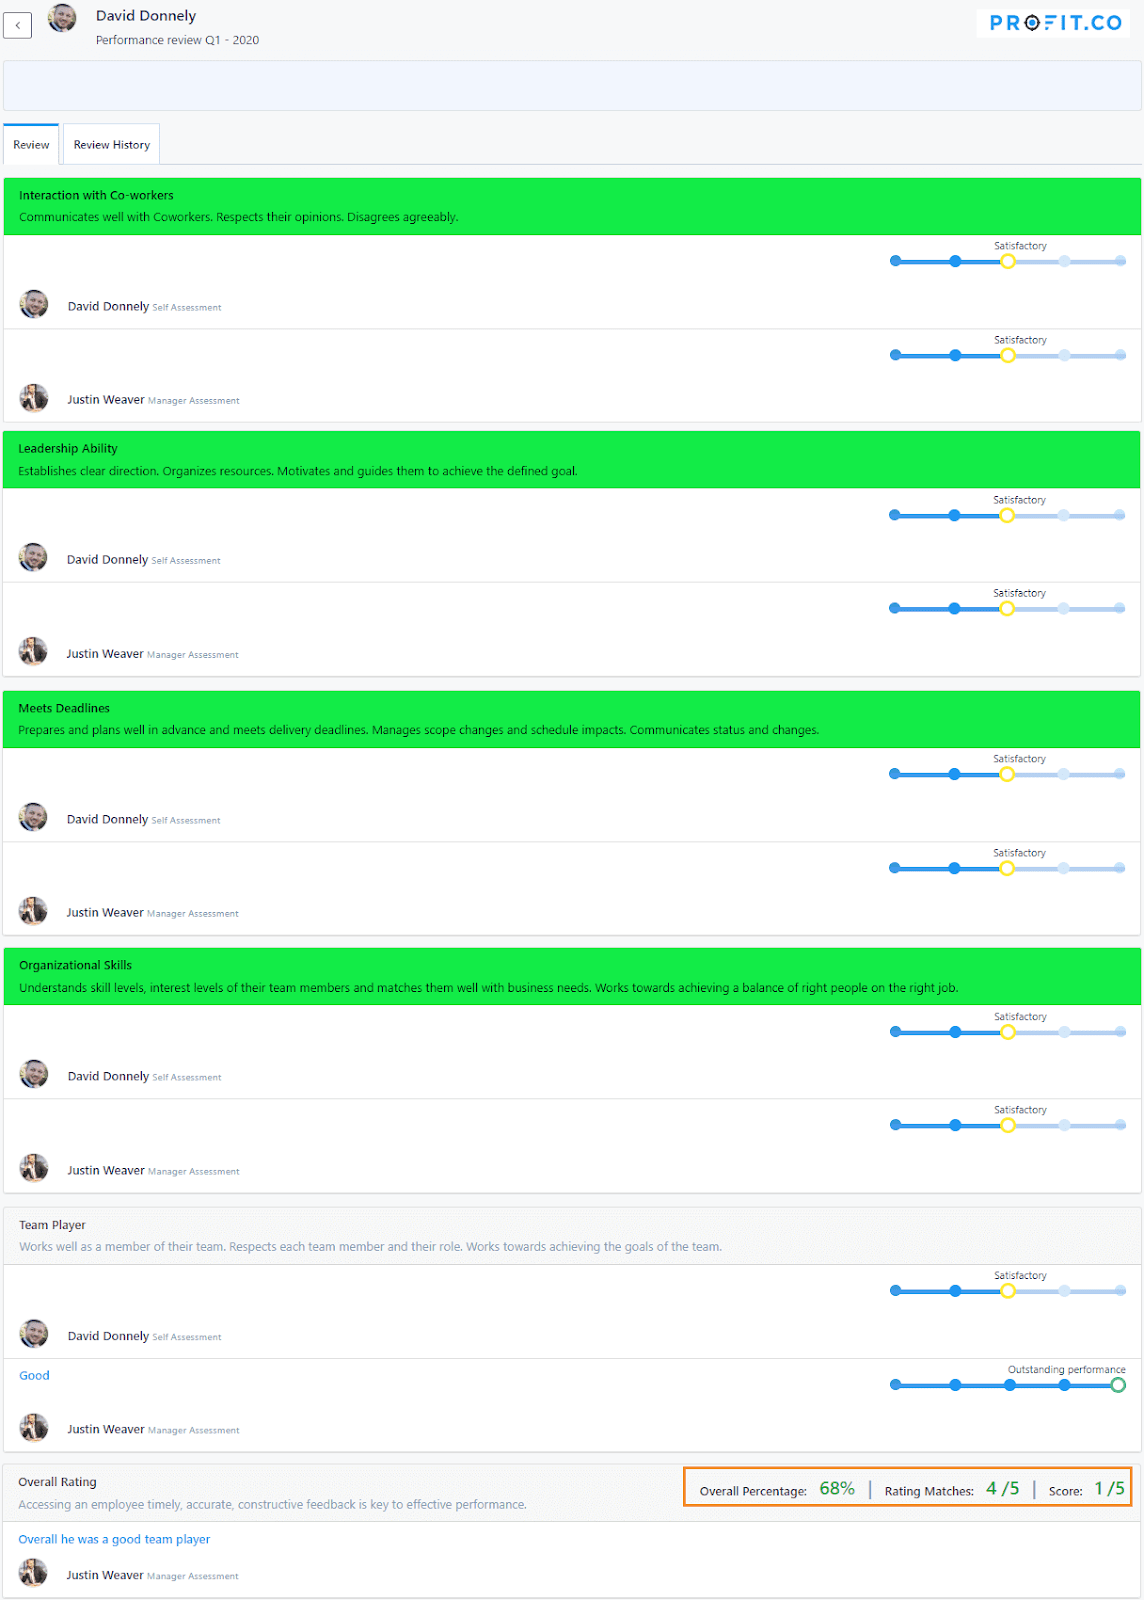
View the overall score of an employee in the performance review:
Profit.co provides three score points in the review summary. These are automatically calculated after the manager has submitted his/her performance rating for the employee. Check out how to view the overall score of an employee in the performance review.
Succession and Development:
There are three kinds of plans under succession and development, namely, individual development plan, performance development plan and potential assessment. All these plans focus on different kinds of performance development targets like improving the performance of employees, generating parameters for reviewing performance and suggesting performance goals to be achieved in order to acquire a promotion.
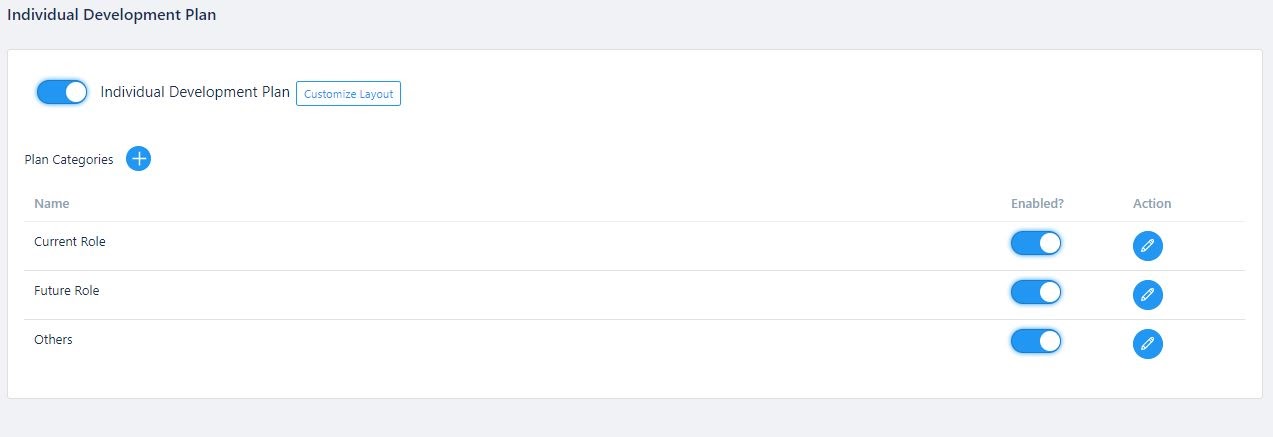
Individual Development Plan:
An individual development plan (IDP) is an individual performance evaluation tool that assists employees in enhancing their career and personal development. The primary goal is to help employees reach short and long-term career goals, as well as expand their professional skills in their current job performance.
A highly customizable plan that outlines the career goals you want to accomplish and the steps you can take to meet those goals through proper identification, organizing and planning.
The Individual development plan can be enabled by the super user for the employees to view and the initiator will Propose the individual development plan for the employees who needs improvement, the coach/ mentor will initiate the individual development plan and the user has to show progress on or before the stipulated time, action will be taken by the manager accordingly.
Performance Improvement Plan:
If the manager feels that the performance of certain employees is poor or below the average level, he may assign performance improvement plans for those employees. A coach or a mentor can also initiate this plan. It indicates that they fall behind the other employees in major professional skills and need to improve their performance in order to fit in the organization. The manager can initiate performance improvement reviews for every quarter or whenever he/she may deem fit do so. This plan may also include peer assessment, affinity based reviewers or secondary reviewers, if necessary. To know more, check out how to enable performance improvement plans in Profit.co.
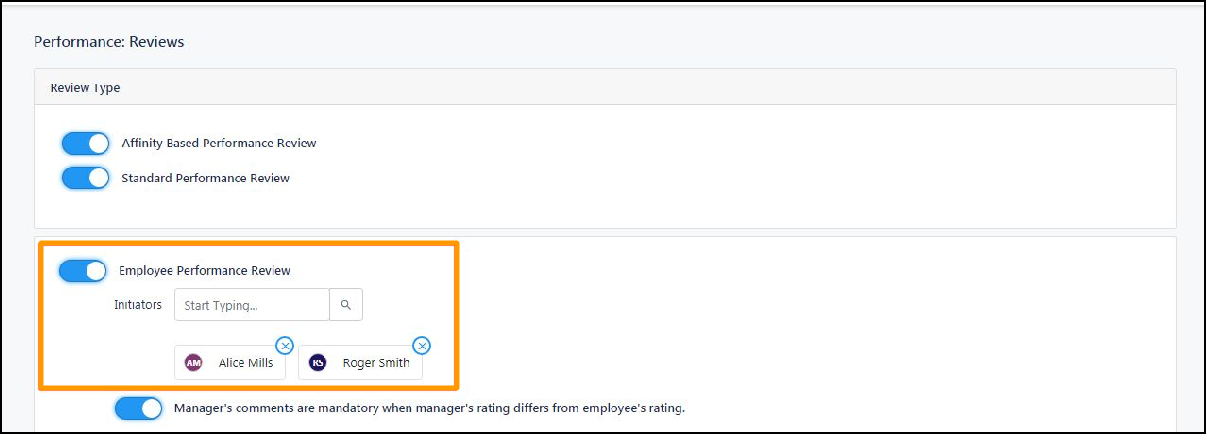
Initiate Employee Performance Review:
You can initiate employee performance review in Profit.co, check out to learn how to initiate employee performance review. To initiate performance review for an employee, select the option. ‘Performance improvement plan’ under succession and development in the performance menu. Once you initiate the toggle and enter certain details inclusive of coach/mentors for the employee, improvement area, description of the plan, the plan will get initiated. Check out how the user shows progress in a PIP.
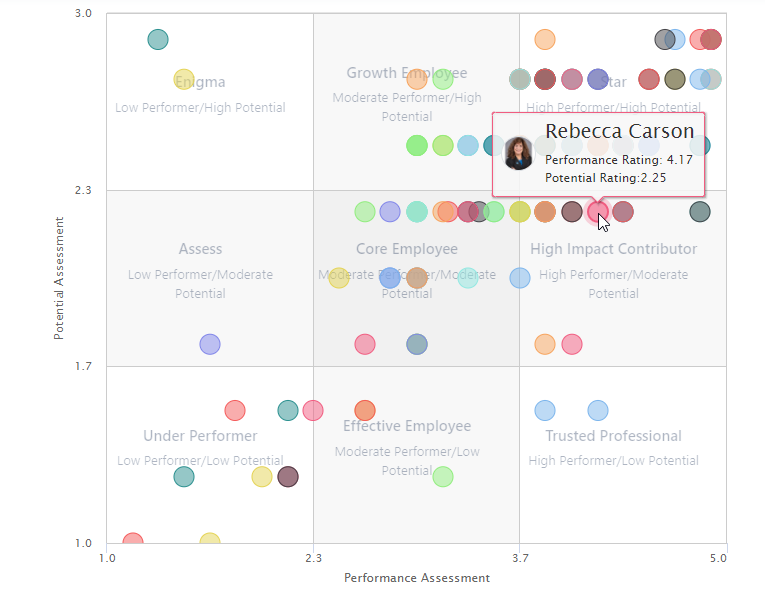
Potential Assessment:
Potential assessment is a default 9-box matrix consisting of performance parameters for the employees. The manager can use this chart for performance appraisal of the employees, as their positions are plotted on the graph automatically based on their performance reviews. These parameters are completely customizable and the HR administrator can add or delete parameters if needed. Usually, performance reviews or individual development plans are initiated only for those employees who have been plotted at lower levels in the potential assessment of the organization.
Settings Options for Performance
Competencies
Competencies are designated skills or attributes that managers would like employees in certain positions or departments to possess. Super Users can write new competencies under Settings → Performance → Competencies.
Create groups of competencies by pressing “Add Competency Group”. Add new competencies to groups by pressing the “+” sign next to the group title.
HR Statuses
HR statuses defines the status of the performance review that is initiated by the HR of your organization. You can know the status of the review by the color code that is suggested by default.
Navigate to Settings → Performance → HR statuses,
: By default we provide 2 statuses Initiated and Closed
When the initiator initiates the review it will be under the initiated status and when the HR adds his comments and closes the review it will be moved to the closed status. To know more about the performance management flow click here
Ratings
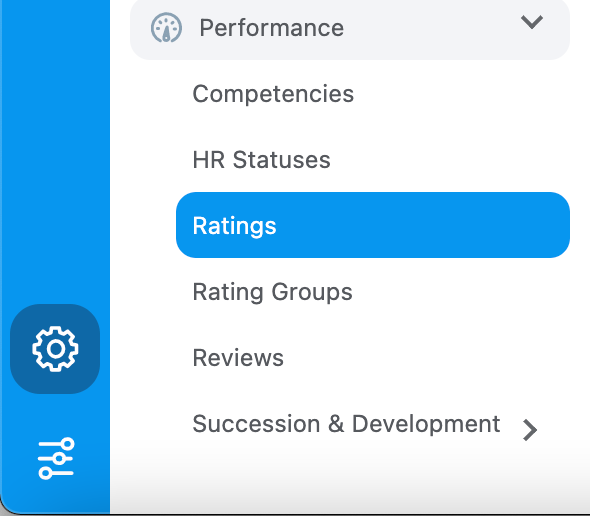
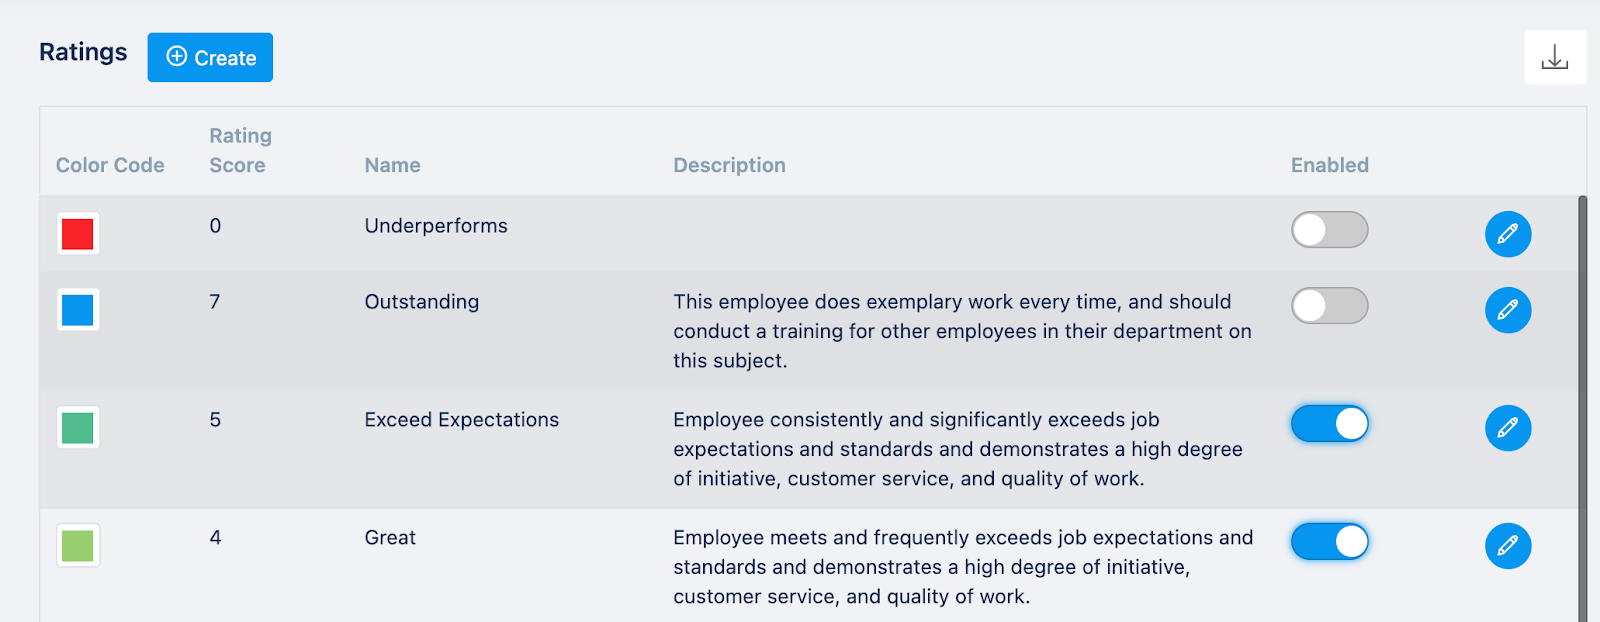
Ratings are used to measure competencies, usually on a sliding schedule. Create a new rating by navigating to Settings → Performance → Ratings.
Press “Create” to add a new rating. Some examples of ratings would be “poor,” “fair,” or “excellent”. These are used to measure an employee performance or skill level for a certain competency.
Rating Group
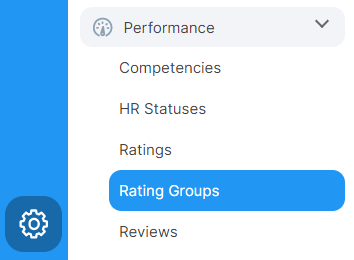
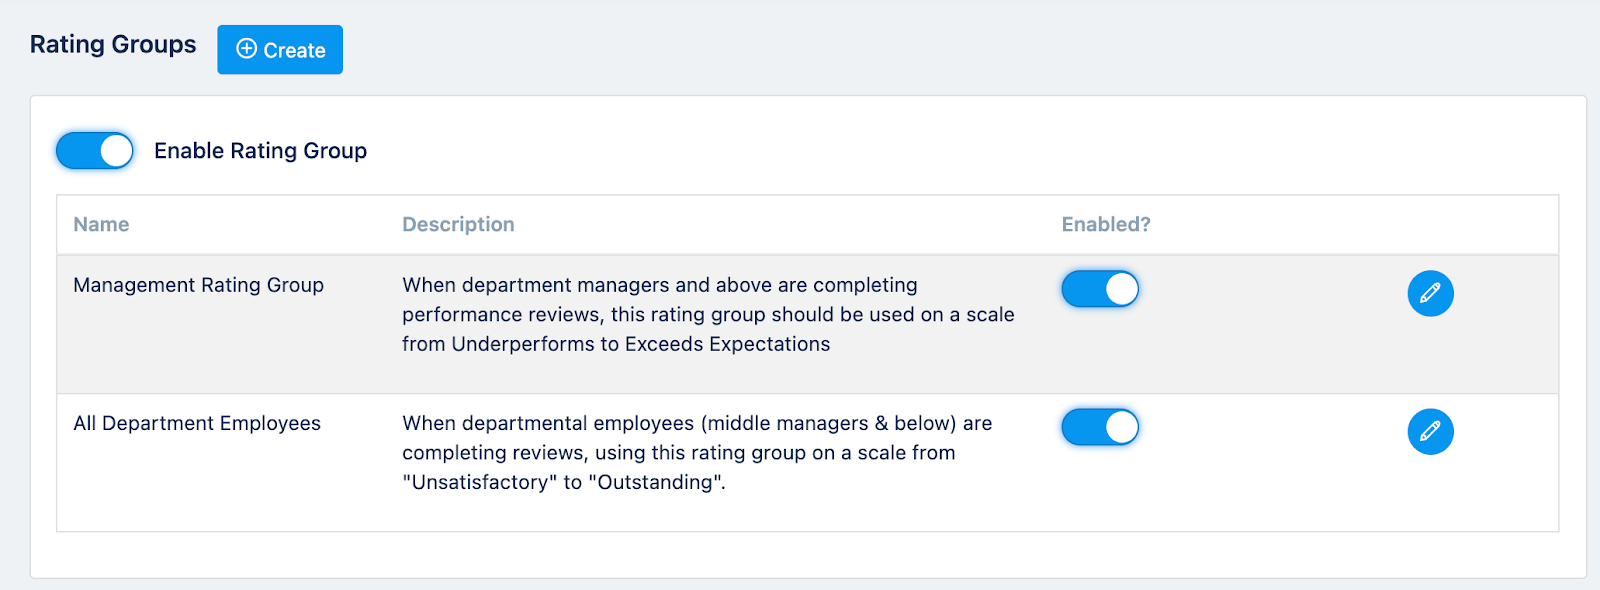
Super users can organize ratings into groups by navigating to Settings → Performance → Rating Groups.
Rating groups are collections of the ratings created under Settings → Performance → Ratings. Rating groups can be associated with competencies on a performance review as a range of options to rate the competency on Create a new Rating Group by clicking “Create” next to the Rating Group title.
Review types in Profit.co
Profit.co supports two review types: affinity-based performance reviews and conversation & feedback reviews.
To enable these review types, navigate to Settings → Performance → Review Types.
Select the toggle to the left of each review type to enable it.
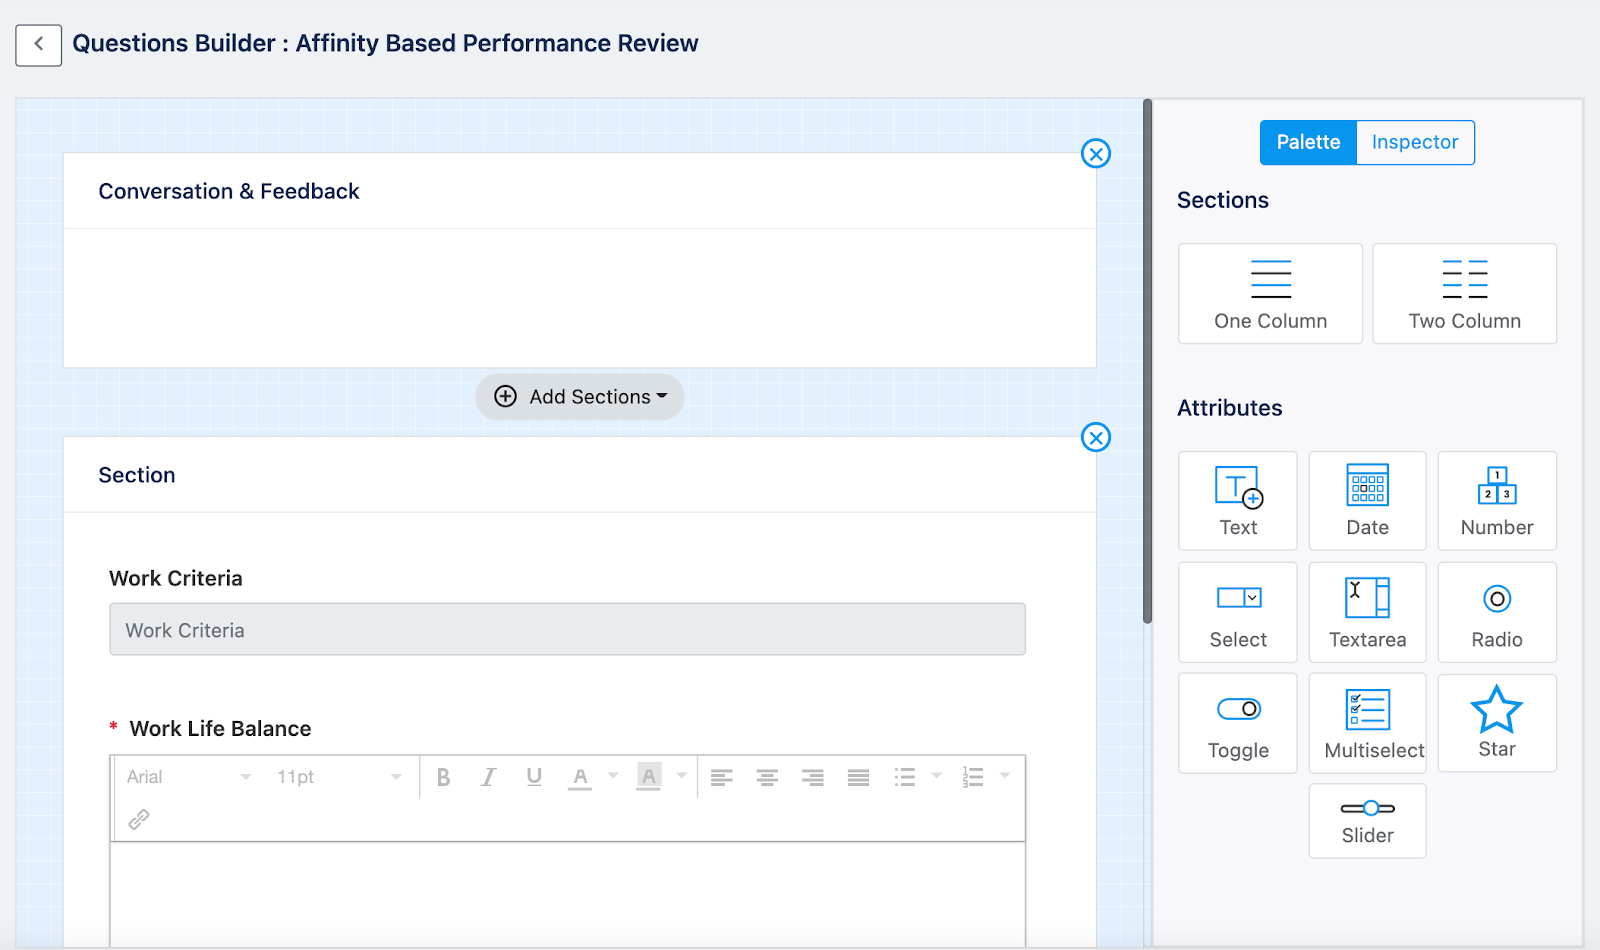
Customizing review questions
To customize questions in affinity based performance reviews and conversation and feedback reviews navigate to Settings → Performance → Review Types.
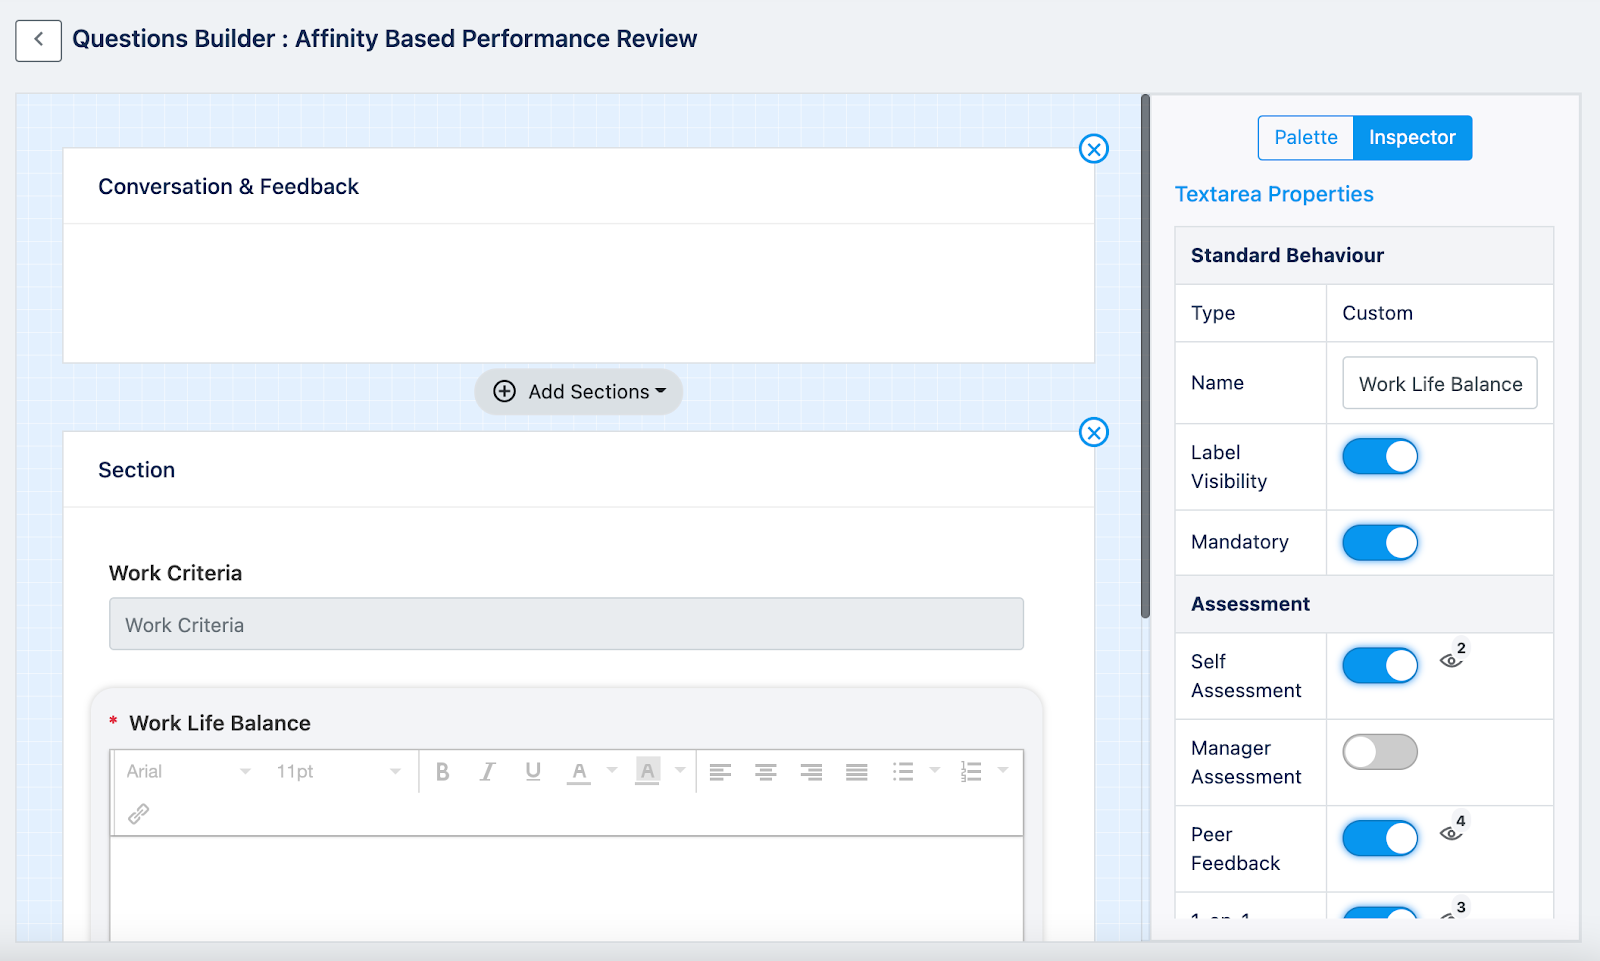
Select “Questions Builder” next to the review type you would like to edit
In the Questions Builder, you can add and edit the format using the “Palette” tab.
You can edit question details, visibility, and make questions mandatory using the “Inspector” tab.
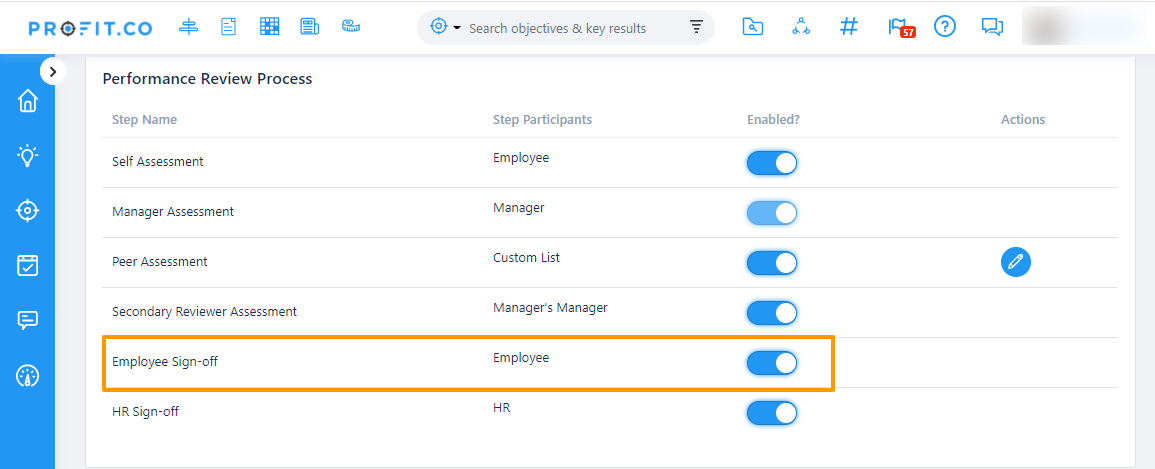
Employee Sign-off
Once the review for the It’s a feature used in Performance modules to observe the result of an assessment given by an employee. We have to enable the toggle which will be present in the Performance review process.To know more about employee sign off click here.
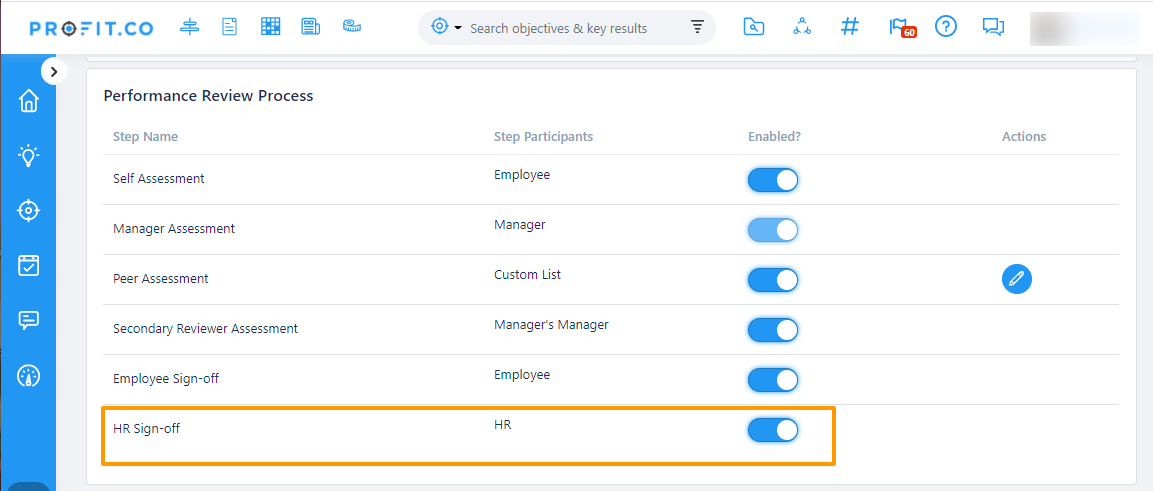
HR Sign-off
Once the over all cycle of the review process gets over, the HR sign-off will close the assessment with the below mentioned steps. We have to enable the toggle which will be present in the Performance review process.To know more about HR sign-off click here.
Secondary reviewer assessment
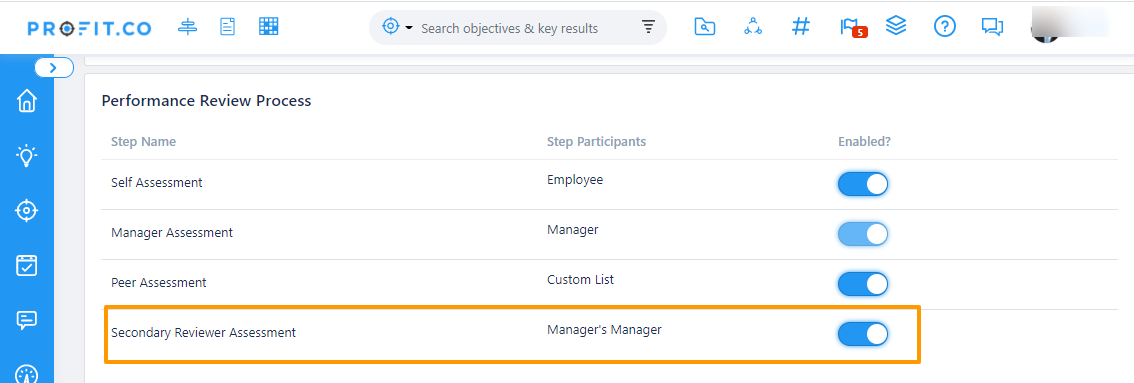
Secondary reviewer assessment can now be enabled via the toggle which will be present in the Performance review process to get an additional review done for an employee which overwrites the manager’s assessment.
To know more about secondary reviewer assessment click here.
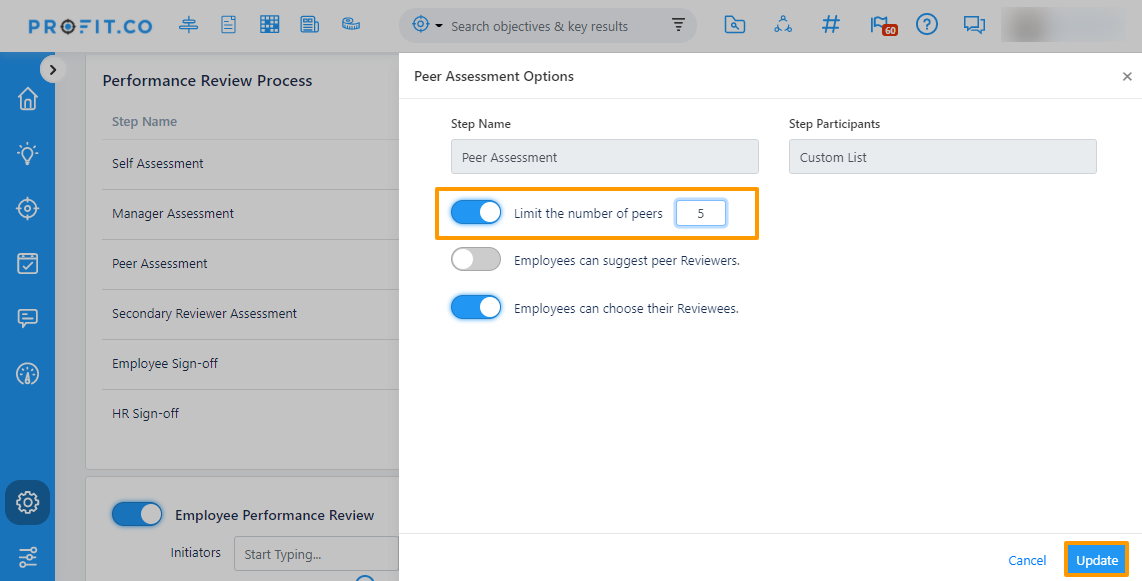
Restrict the number of peers
While you perform peer assessment review in performance management this helps you to set a limit to the number of peers that can be nominated for peer reviews. Firstly you should enable the toggle named set the number of peers and set a count for that.
To know more about the restriction process click here.
Auto approve Peers:
HR can now auto-approve peers added by the employee during self-assessment.
To know more the flow process click here.
Goals
Goals are present in the Performance Modules to improve the employee’s individual performance by linking the performance with the individual goals . First we have to enable the Goals which will be present in disabled state by default inside the Settings.
To know how to create goals click here.
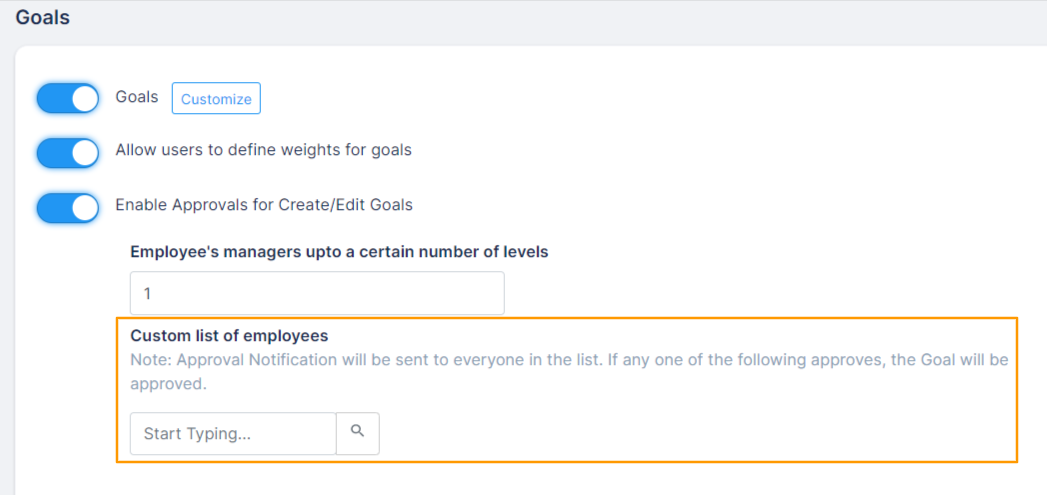
Approval Flow for Goals:
Creating goals can go for one round of approval to the managers once created/edited/deleted by the employees to have a check on their work and progress.
To know more about the approval flow click here.
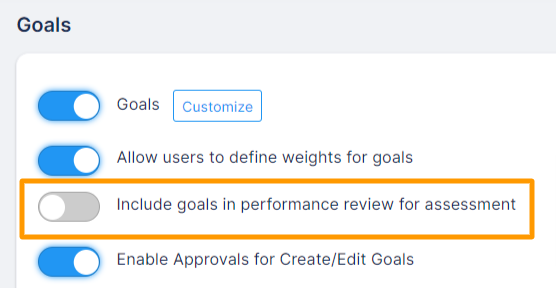
Link Goals with Performance Reviews:
You can now link goals in the performance review while doing an assessment in Profit.co. Managers can assess the employees against each goals.
To know more about the linking process click here.
Goal Progress Dashboard:
Access goals progress in an exclusive dashboard to see all the employees goals progress and gives a holistic view in one place in the form of dashboard.
To know more about this click here.
Export Reviews in HR Dashboard:
You can now export the self assessment, compiled peer feedback for each employee, the list of peers who reviewed each employee, manager and secondary manager reviews that you circulate during performance assessment via PDF format in Profit.co
To know more about exploring the performance reviews click here.
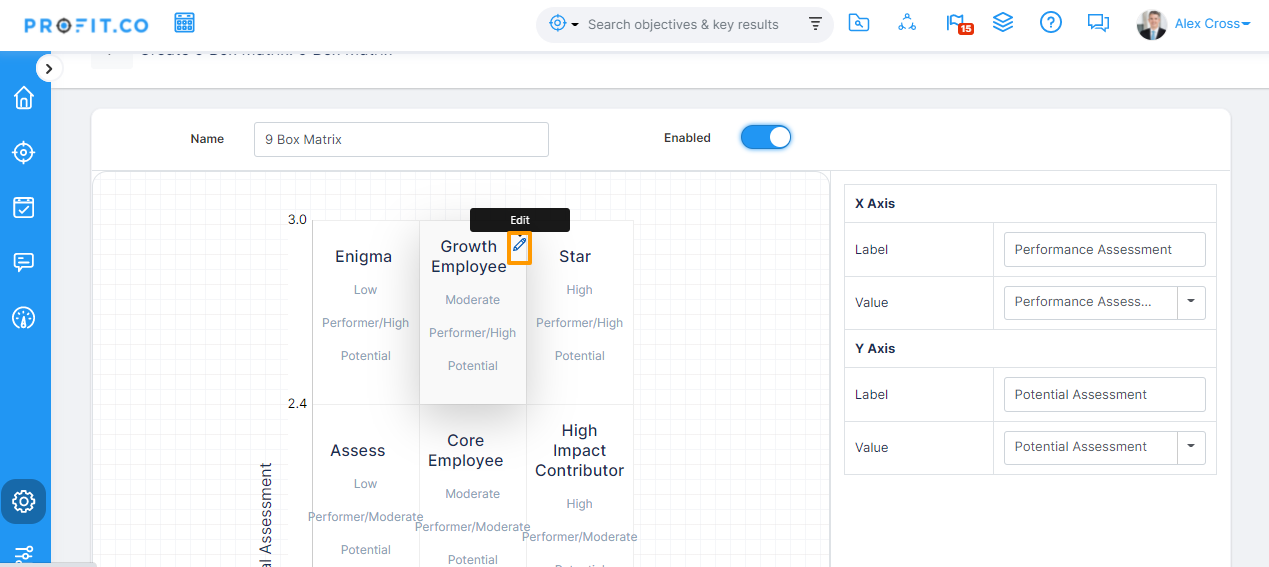
Customize 9 Box Matrix:
We can customize 9 box matrices and can evaluate the company’s talent pool. Customize box headings, descriptions, and additionally change the title or value of the X and Y axis so you can tailor review data and presentation in the way that is most valuable for your company
To know more about the customizing process click here.
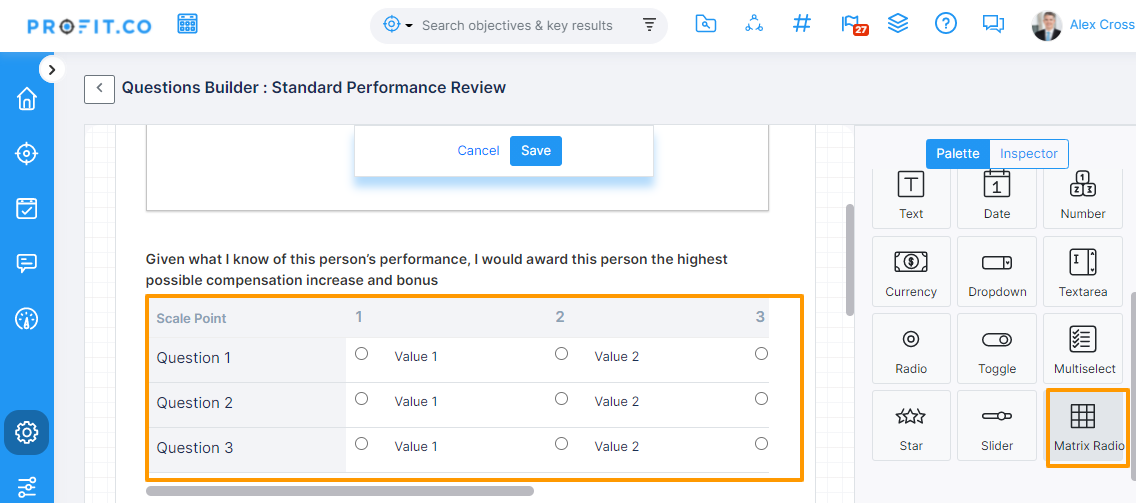
Matrix radio question for a performance review in Profit.co
You can now build your performance review questions using Matrix radio question support. In a performance review/survey, matrix radio question type is useful where you have several multiple-choice questions or statements, all with the same set of possible answers or different sets of answers.
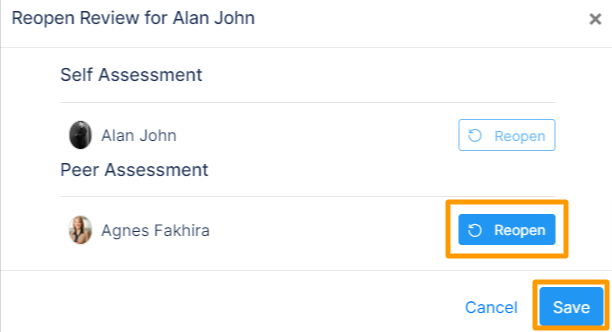
Reopen Peer Assessment from HR Dashboard:
HR can now reopen the assessment of peers from the HR dashboard as well.
To know more about this process click here.
Restrict the number of peers in peer assessment:
Restrict the number of minimum and maximum peers while you perform peer assessment review in performance management.
To know more about the restriction process click here.
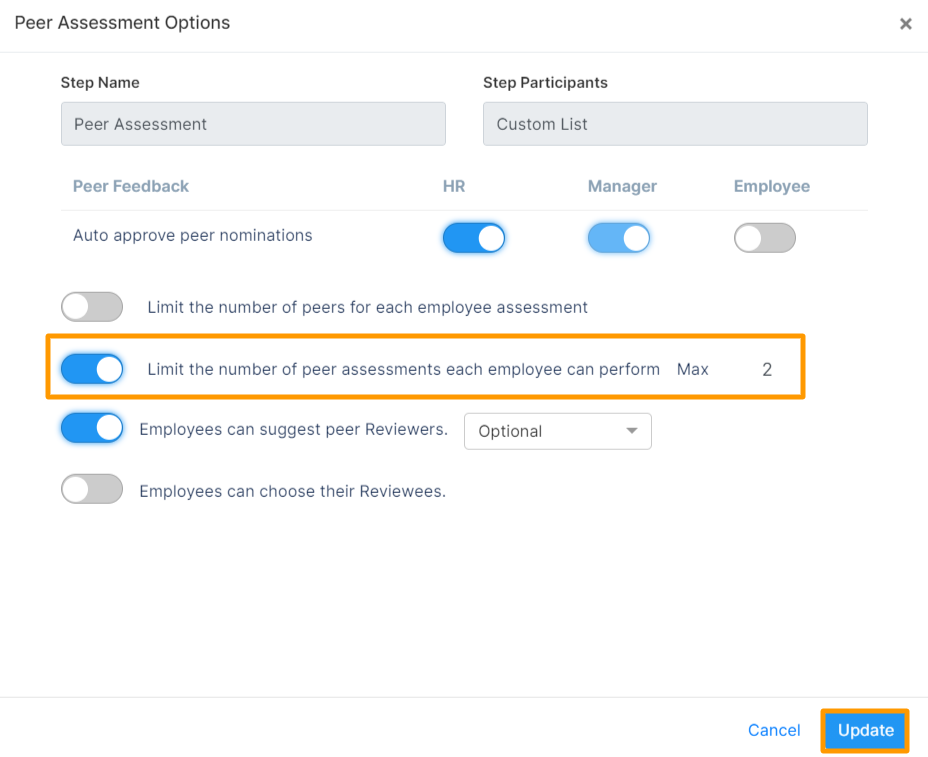
Limit the number of peer assessments an employee can perform :
Limit the number of peer assessments an employee can perform for an initiated performance review to give room for others to perform peer assessment and also avoid the same person giving peer assessment to more number of employees.
To know more about this processclick here.
Different evaluators can rate the competencies in the performance assessment
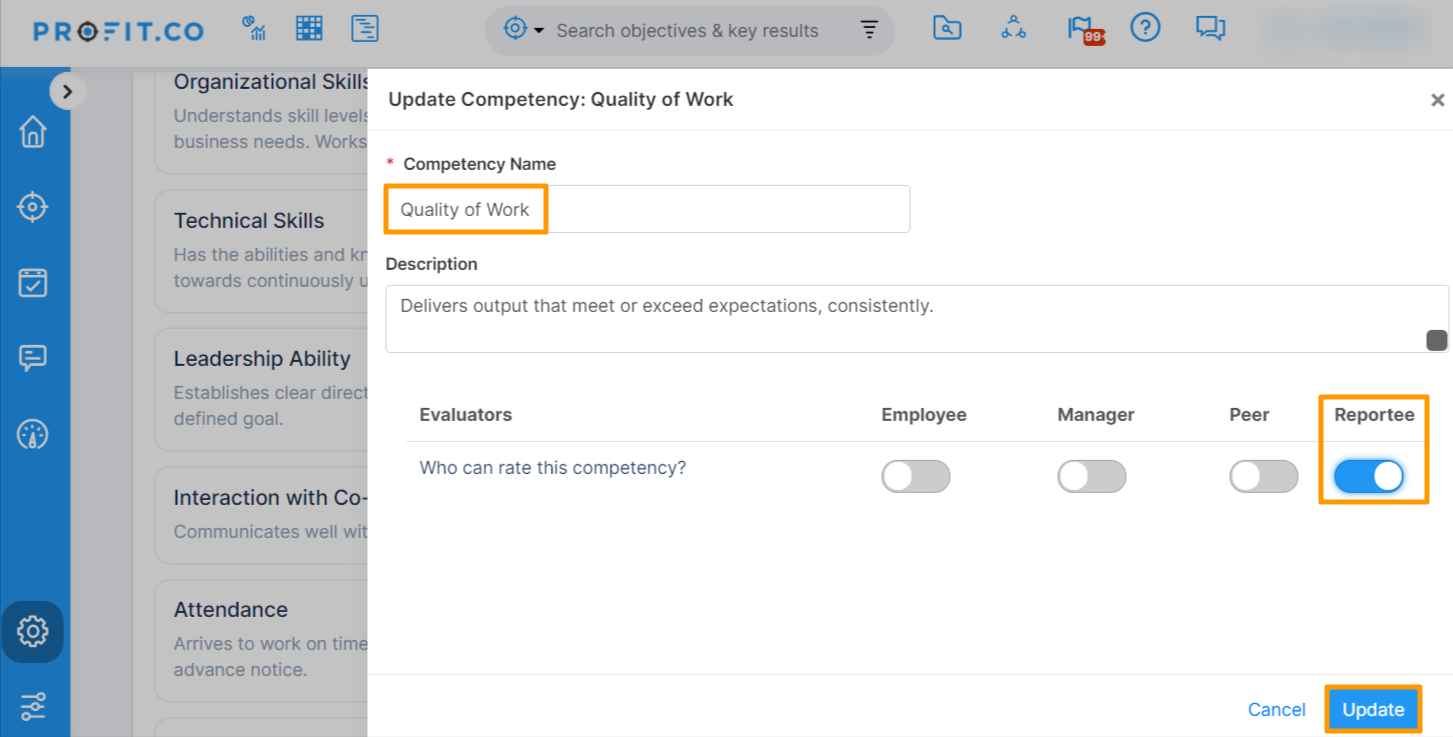
Profit.co provides a new toggle for reportees, that can be managed while adding new or editing existing competencies. One more form of Evaluator introduced for assessing the Individual in Competencies. If we want a particular competency to be rated by a group of reportees who reports to a particular user then this toggle can be used in combination with department or job title
Review Summary Dashboard
In Review Summary Dashboard provides all the open ended answers provided by the managers and peers can be viewed in the dashboard at one shot.
To know more about the Review Summary Dashboard click here.
General
Security
API Access
The superuser can integrate the Profit.co app with other applications using the API Access key. It is an advanced feature available only in the enterprise plan subscription. The user also has the option to regenerate the access code or key whenever required. To know more about API access, check out how to find and use the API access key.
User Access
Navigate to Settings → Security → User Access from the left navigation panel.
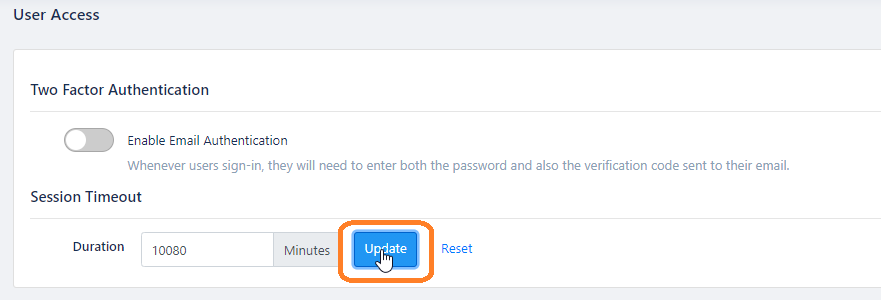
Profit.co allows super users to update the default session timeout period.
Note: This action will be performed by the superuser at the firm level which is set by default as 20160 minutes = 14 days.
To know more about default session time and to update the session timeout click here
TV and Devices
The superuser can also set up the Profit.co app in their Apple TV and monitor the progress of their organizational goals. The installation and set up procedure is very simple. By using the app on other devices, the user can manage the OKRs of his organization from other locations like home. The display monitor of the TV can even be set up in other premises of the office for observation and analysis.
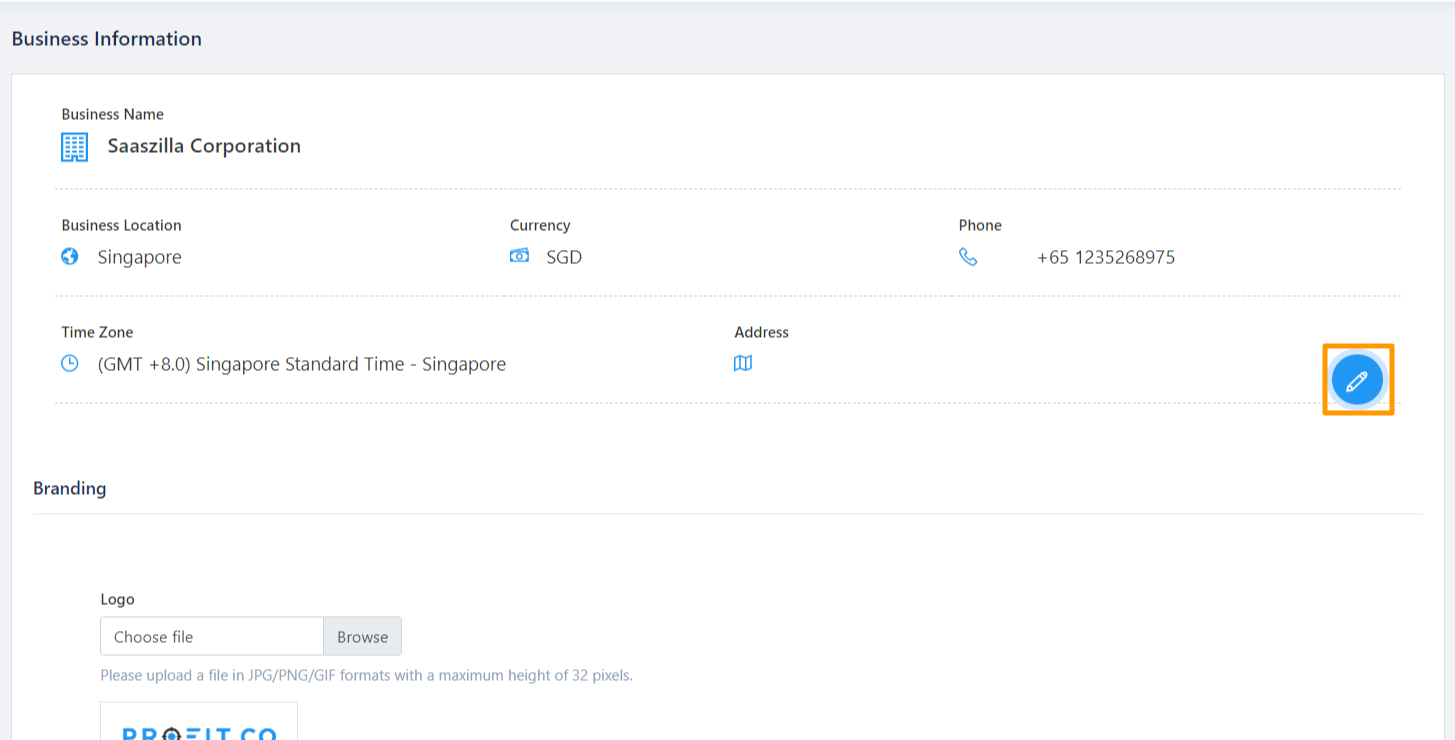
Business information
The Business information segment in Profit.co records the significant information related to the industry. You can also find the information of the user of the account. To know how to edit business information, click here.
Action Center
Action Center helps you to find out the assigned and pending actions that are yet to be done by you. It also allows you to complete the pending actions at a single juncture. Also it helps you to find the pending actions and the updates of your team members in the same place.
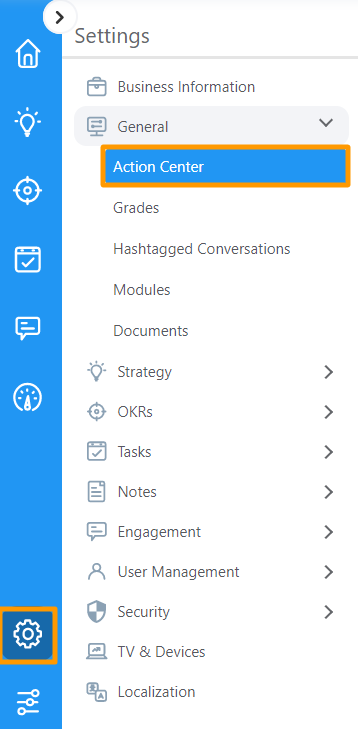
You can find all the configuration options related to the Action Center through Settings → General → Action Center.
Notification of pending actions as a daily summary
You can enable the option to receive email notification for pending actions on a regular basis.
You can enable the email summary notification through Settings. Click here to know how to enable daily summary.
Grades
Employee grading is one of the practices used in performance management. Many organizations use employee grades to differentiate between positions and determine the level of complexity, decision making, and skills required for each job.
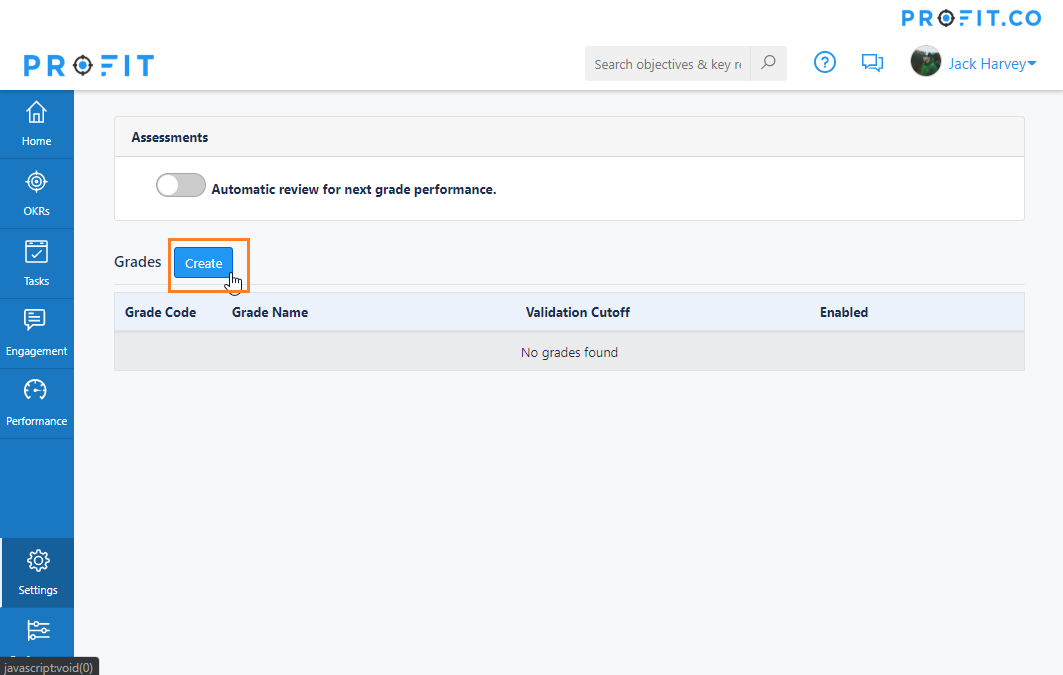
Creating Grades
Navigate to Settings —> General —> Grades
Click on Create to create a grade.
Enter Grade code, Grade Name, and Validation cutoff to advance to the next grade level, also validation cutoff to be promoted into this grade. You can also add competencies to employee grades to get employees reviewed for the particular grade level.
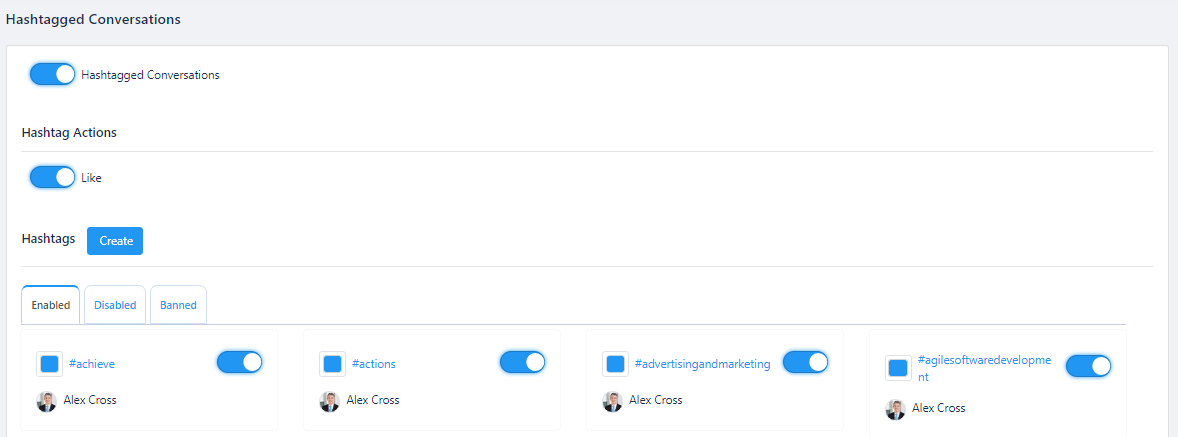
Hashtagged Conversations
Hashtag helps you to communicate and converse with others throughout the organization. Learn how to enable and configure the Hashtagged conversations by clicking here.
Modules
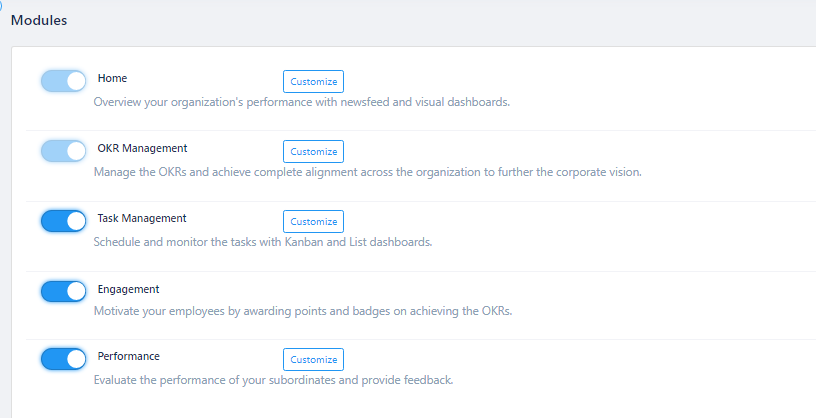
Modules help you to control and manage the most significant functions in Profit.co. Modules are those which appear on the Left Navigation panel.
Enable/Disable Modules
From the left navigation panel, select Settings → General → Modules. You will be directed to the Modules page. Here you can enable or disable the desired modules.
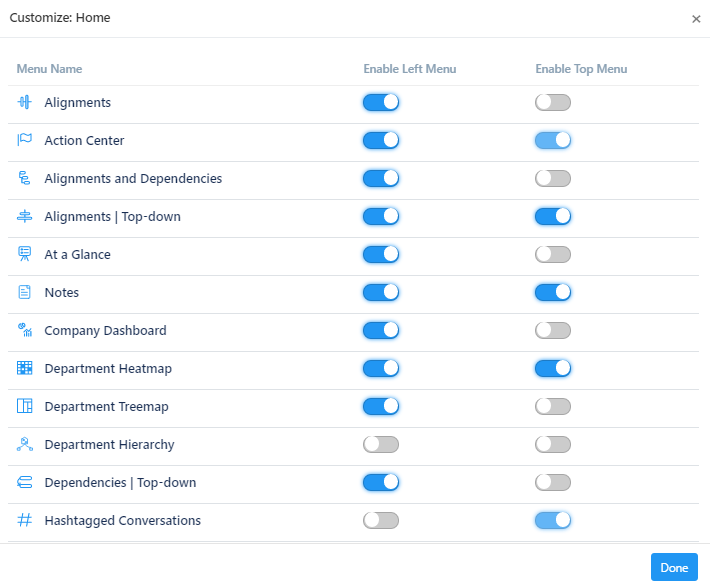
Also you can see customize option which helps you to add/remove the options under that corresponding modules in left navigation panel
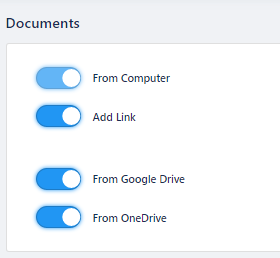
Documents
Users can attach documents under Key Results and Tasks from different sources and this can be configured by superusers through Settings. Click here to know more about it.
OKR backlog
The superuser can move certain OKRs to the backlog if it is irrelevant or redundant. To know how to move an OKR to the backlog, click here. OKRs that have been moved to the backlog, can also be retrieved and made available.
In the same manner individual key results can be moved to the backlog, created from the KR backlog. To know more on how to create a key result backlog, click here.
Integrations
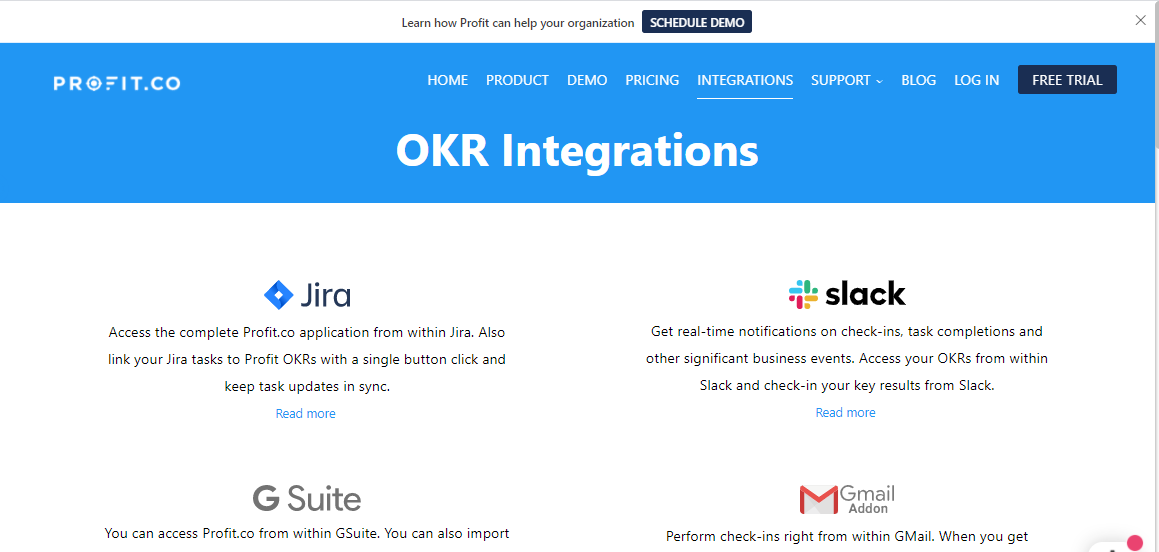
Profit.co allows you to integrate your account with more than 24 independently designed work, project, tasks, dashboard and system apps and manage your OKRs. Click here to check out the list of softwares that can be integrated with your Profit.co account.
To Know more about integration in the form of Video links click here
Billing
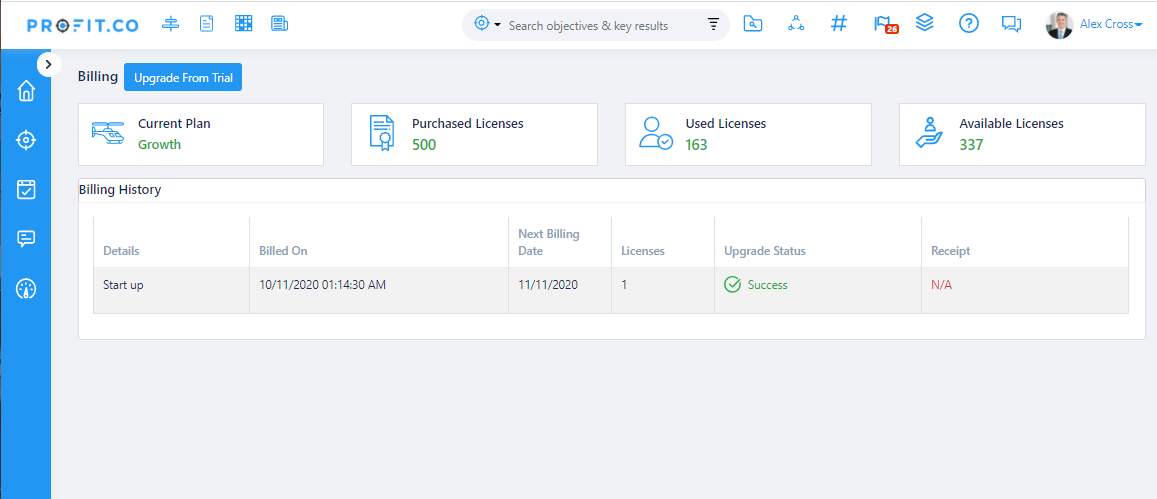
You can manage billing and upgrade your license via the Billing option in Settings. Know our pricing plans and upgrade your account. Also, know how to repurchase plans that expired and purchase new licenses in Profit.co.
At first, you can try our trial start up plan, which is free of cost. This plan has limited features with respect to the number of users as well as OKR setups. To gain accessibility of all our basic features, you can choose the growth plan which costs only $7 per user per month, in case of an annual subscription. Our growth plan offers fully equipped features to be used for small scale organizations who want to explore the world of Profit.co for the first time.
To enable exclusive features like Whitelisting of IP addresses who can track your domain and API access integrations in your app, it is recommended to opt subscription for the enterprise edition of the pricing plan. With the subscription of any of the paid pricing plans, you also get access to personalized support and guidance from us. We also offer you a 30 days free trial period for our paid plans without the requirement of credit card details.To know more about the features offered through our individual pricing plans, click here.
Delete Account:
If the super user wants to delete their organization’s Profit.co account permanently, they can do so by selecting the “delete my account” option under settings. It is essential to know that this option cannot be undone. Once a user’s account is deleted, it cannot be retrieved. You can click here to learn more on how to delete your user account.You will also stop receiving email notifications once you delete the account.
Localization
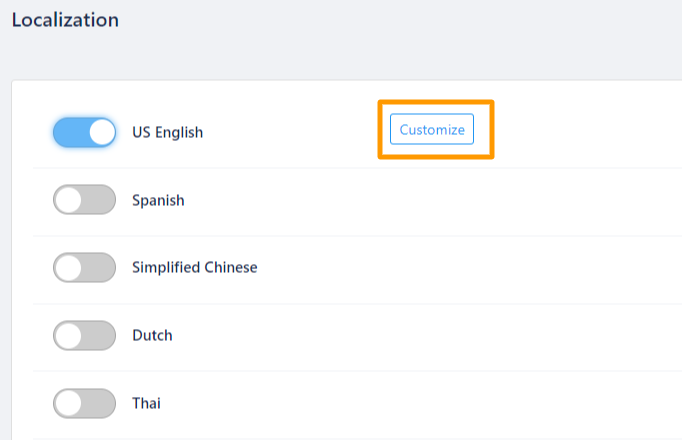
Localization helps you to access the language options in Profit.co. You can use Profit.co with your desired language and can progress the OKRs efficiently. Click here to know how to customize localization.
Teams
Team is a cross functional unit where users from various departments will work on a common goal. There is not much difference between a Team and Department.
Teams cannot be deleted. You can disable it, if needed it can be used at any time. Learn how to create a team in Profit.co.
Newsfeed
Creating a predefined News Feed filter
Users have the ability to filter out OKRs Via News Feed by Setting Predefined set of Scenarios to suit their requirements.
- Users can use and run a variety of Predefined OKR filters as per their needs.
- Super users can create a Predefined OKR Filter.
- Navigate to Settings → Newsfeed → Predefined filters from the left navigation menu.
- CYou can see some Predefined News Feed Filters.
- Click on the edit icon to edit the existing ones or use the Create button to create new.
- The Predefined Filters menu will now appear on the right-hand side.
- Click on the Create button , the predefined filter will be created..
- The created Predefined Filter is now available in Home → News Feed and can be used to filter out OKRs.
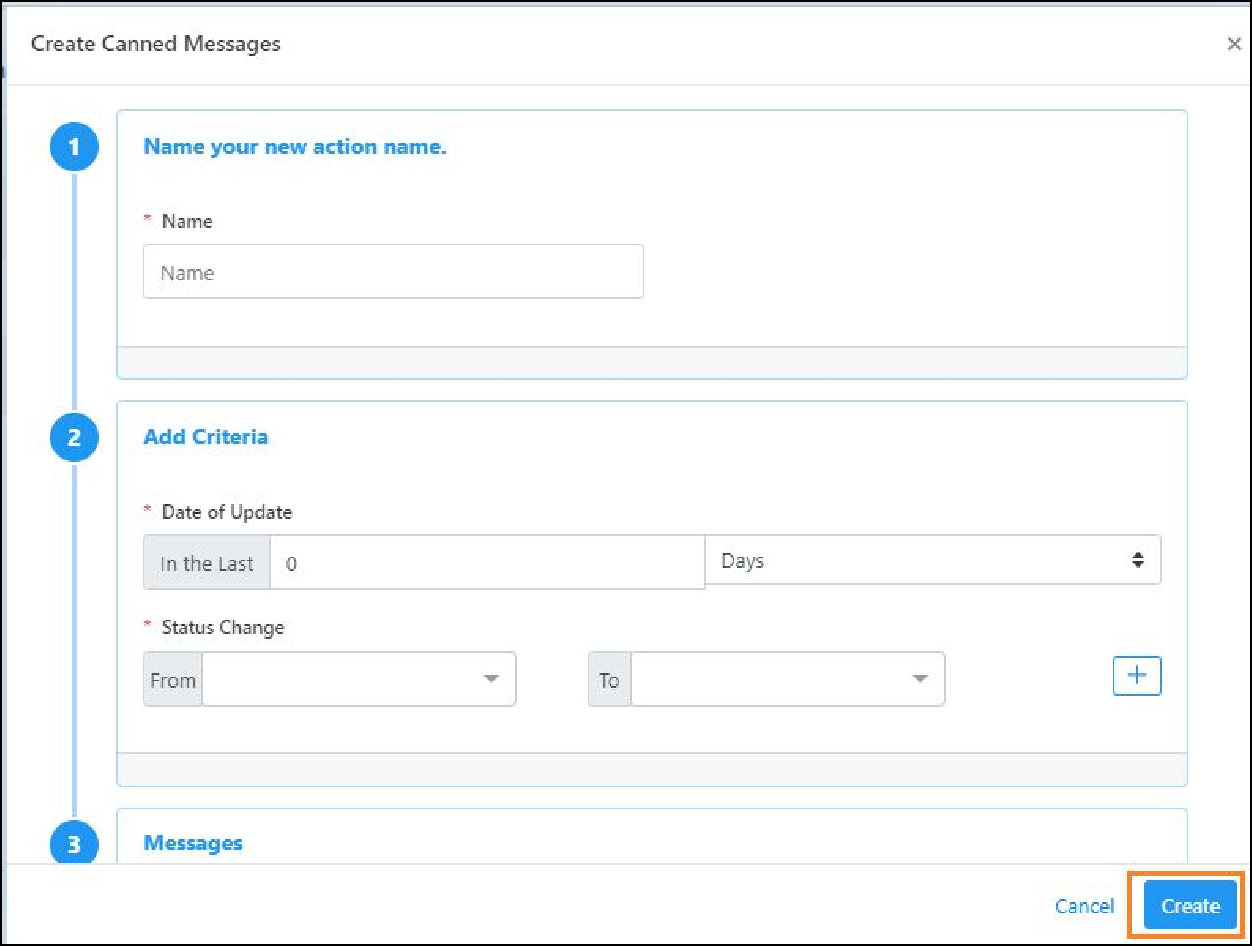
Create canned messages for Newsfeed
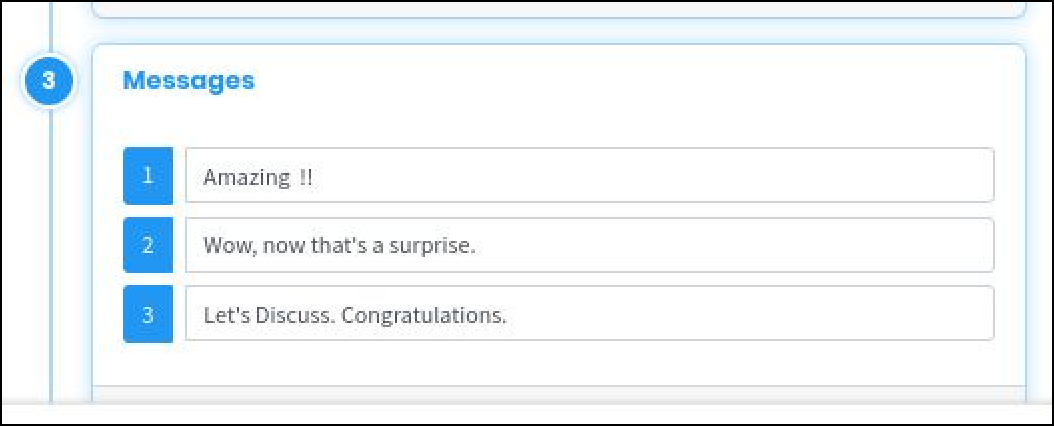
Users can create custom canned messages for varied Status Updates that appear in news feeds.
- Navigate to Settings → News feed → Canned message from the left navigation panel.
- Click on the Create button. A side panel will open.
- Add the period for the scenario.
- Set Custom canned messages.
- Click on the Create button to add the custom canned messages. These canned messages will show up once the status is updated (for which these canned messages have been created) and it will appear on the newsfeed.
